


1.Welcome to DJUCED
Welcome and thanks for using DJUCED.
DJUCED is a powerful but simple to use DJ software.
It offers audio track mix, remix, PAD performance, scratch and music recording features.
DJUCED is designed to make mixing easier and more enjoyable, thanks to a unique graphical interface and ergonomic features.
With its audio decks, its effects, DJUCED is perfectly cut for the mix. Add the sampler decks, the sample pack provided, the SLIP; SNAP; quantification and you have all the assets to achieve your performance.
With the included DJ Academy, discover the DJ universe and learn the best DJ tricks
With demo tracks and sample pack start using DJUCED immediately.
To go further, we invite you to consult the tutorials available on our website.
2.DJUCED Version 6 brings the following new features
2.1.Release Notes
Check DJUCED release notes to see the improvements, added and checked features.
You can also find useful information in the knowledge base.
3.DJUCED Interface
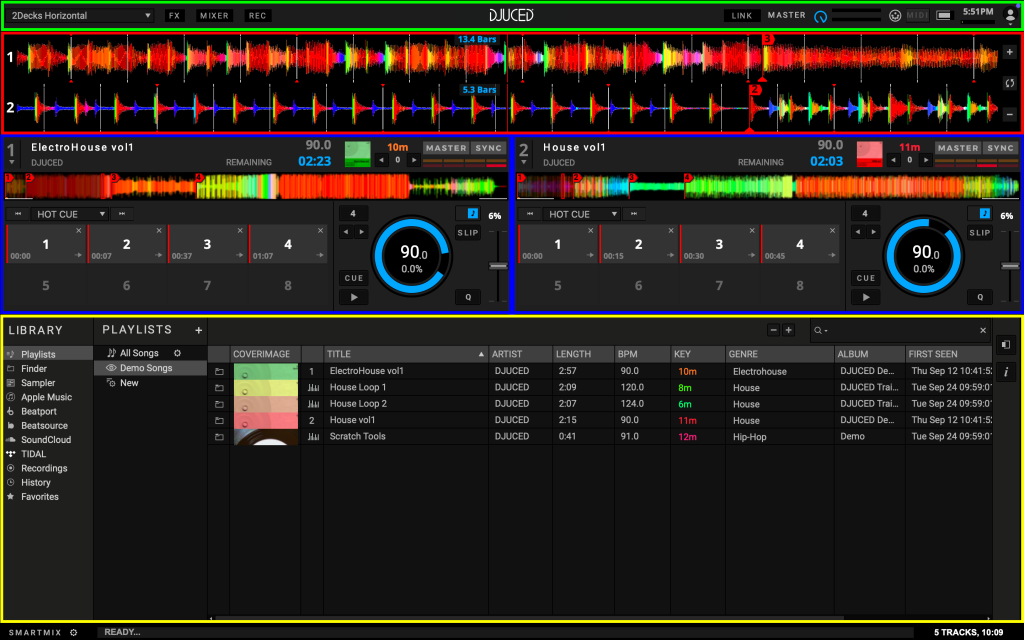
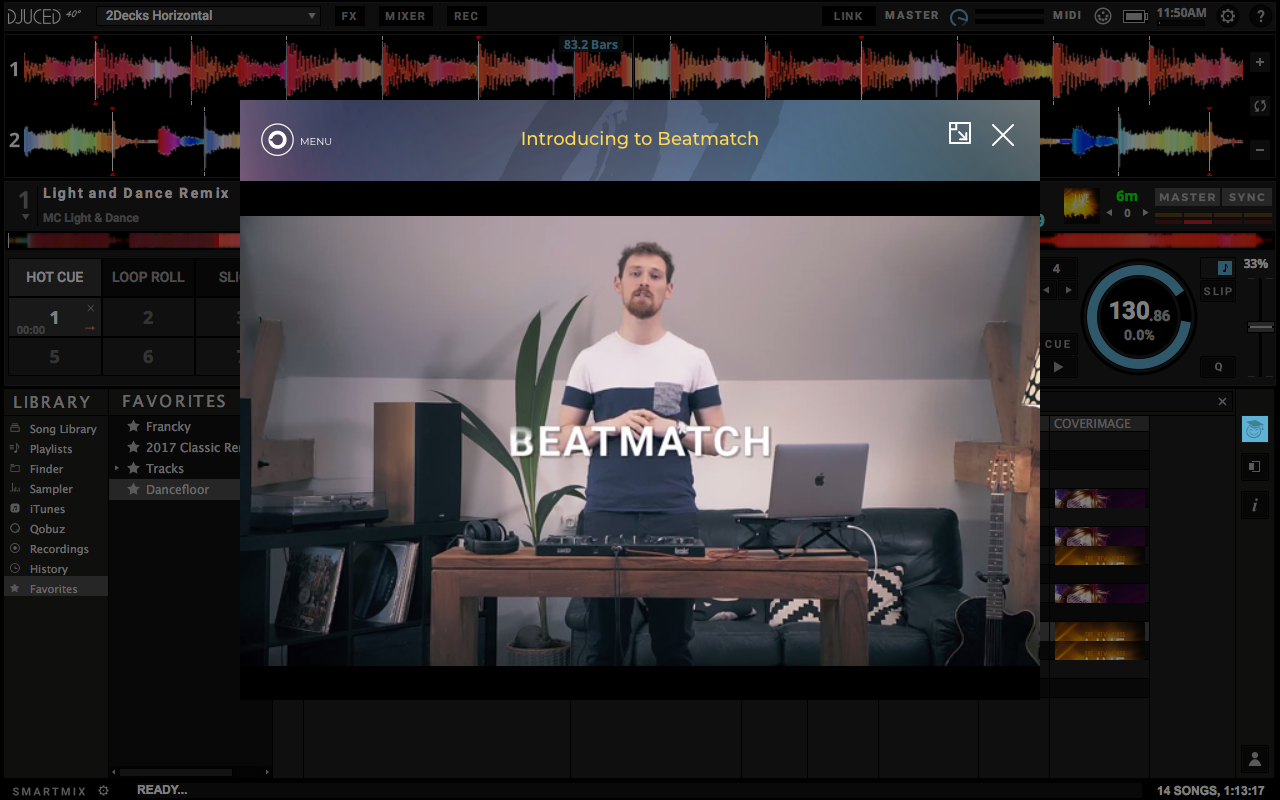
By default DJUCED displays a simplified interface
This interface displays the top bar (in GREEN) two decks (in BLUE ) with horizontal waveforms (in RED) and the browser (in YELLOW) with the fast access icons.
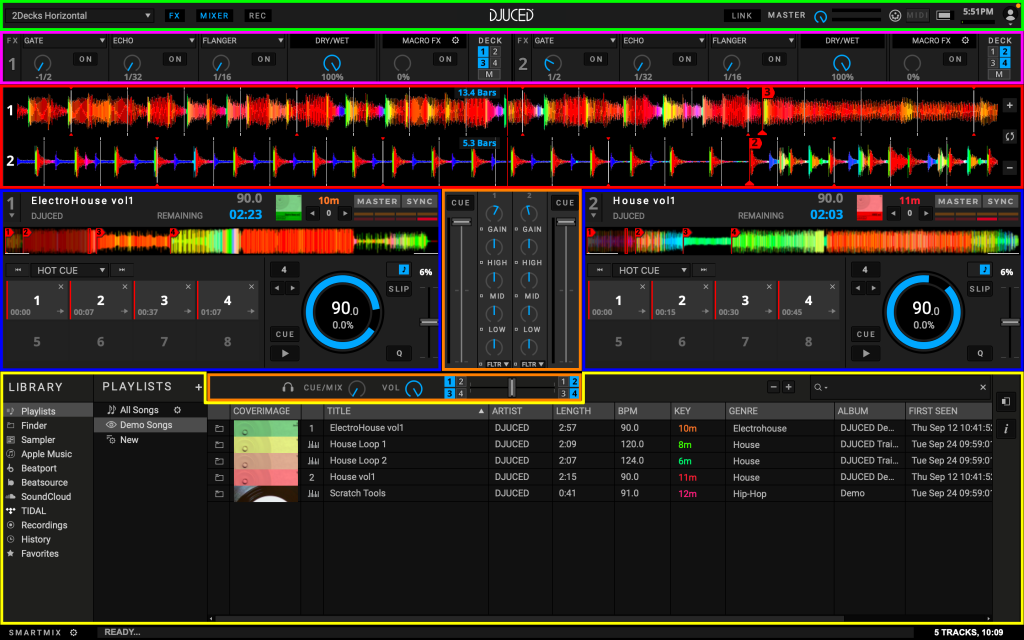
If you turn on all DJUCED modules on the interface.
- The top bar (in GREEN)
- The effects (in PURPLE)
- Decks (here in BLUE), with horizontal waveforms (in RED): here you can load and play another track or samples and control playback
- The mixer or mixer (central section, here in ORANGE); here you can mix the decks and use the crossfader, volume and EQ controls
- The browser (lower zone, here in YELLOW); the track library is the storage location for music files.
- Fast access icons
4.SYSTEM BAR
The system bar is located at the top of DJUCED. It manages the size of the DJUCED display and the DJUCED basic functions.
It displays from left to right:
4.1.Layout selection
DJUCED gives you different layouts to adapt the display to your needs.
![]()
- 2 Deck Horizontal: The Waveforms are displayed horizontally on top of the Virtual Decks.
- 2 Deck Vertical: The Waveforms are displayed vertically between the Virtual Decks.
- 2 Deck Horizontal + 2 Samplers: 2 Multilayer Samplers Decks are added to the 2Deck Horizontal.
- 2 Deck Vertical + 2 Samplers: 2 Multilayer Samplers Decks are added to the 2Deck Vertical.
- 4 Deck Horizontal: The Waveforms are displayed horizontally on top of the Virtual Decks.
- 4 Deck Vertical: The Waveforms are displayed vertically between the Virtual Decks.
- Browser: Extends the browser to help for a better track preparation and navigation.
- Prepare: One deck mode dedicated to track preparation. Adjust the beat grid and set cue points.
4.2.FX PANEL SWITCH
![]()
Display or Hide the Effects Panel
4.3.MIXER PANEL SWITCH
![]()
Display or Hide the Mixer and the Crossfader Panel
4.4.RECORD PANEL SWITCH
![]()
Display or Hide the Recording Panel
4.5.ABLETON LINK
![]()
Click to Enable or Disable DJUCED from the Link network.
What is Link? Link is a technology that keeps devices in time over a local network (ethernet and wireless), so you can forget the hassle of setting up and focus on playing music.
https://www.ableton.com/en/link
Every Link-enabled Softwares can play in time with DJUCED.
The Link-enabled software will remain in tempo and synchronization with the MASTER deck playing in DJUCED. If you change the TEMPO of the MASTER track playing, all the Link-enabled software will follow the change and vice-versa.
4.6.MASTER LEVEL OUTPUT
![]()
Adjusts the Master Level Output of DJUCED.
This knob controls the volume of the mixed sound DJUCED is sending to the audience.
The master-level meter turns all red when the sound sutures. Adjust the master level or the tracks gain levels to correct this.
Tips: Remember that the VU-Meter should never be in the RED zone. It results of saturation and distortion. If your controller has a Hardware Mixer integrated, set the Master Level to the Maximum Value, and watch the VUMeter of your Mixer.
Tips: If your controller sound card has a hardware MASTER volume control, DJUCED MASTER volume control is disabled
4.7.MIDI CONTROL
![]()
When the MIDI Symbol is blinking, it indicates that DJUCED is receiving data from a MIDI controller.
It is very useful to test if your controller is correctly seen in DJUCED.
4.8.BATTERY LEVEL STATUS
![]()
Indicates the amount of charge of your computer’s battery.
Tips: When mixing with a laptop, always consider using it with a power supply plugged. Disable USB power-saving options and screensavers to avoid any unwanted Midi or Audio disconnection.
4.9.SYSTEM CLOCK
![]()
Display the system clock
4.10.AUDIO CPU LOAD METER
![]()
This Audio CPU meter shows DJUCED’s audio processing load.
DJUCED’s CPU meter shows the audio processing load but not DJUCED’s overall CPU usage. This means you may see a different CPU value when checking Activity Monitor (Mac) or Task Manager (Windows).
To determine the CPU load, DJUCED calculates the time it needs to process one audio buffer.
This value is then compared to the time it takes to actually play one audio buffer.
For example, a value of 50% on the CPU meter means that DJUCED is processing one audio buffer twice as fast as it takes to play the buffer.
Values over 100% are possible when the calculation takes more time than it does to play one audio buffer, and will results with glitches and pops in the audio.
DJUCED expects that the audio thread will have the highest priority, however the final prioritization of threads is done by the operating system, meaning DJUCED’s processing might get interrupted.
This is why other applications may cause CPU spikes in DJUCED’s CPU meter.
Another reason for different values in Activity Monitor or Task Manager is the system CPU meters normally show 100% per core/CPU.
For example 200% CPU load on the system meter of a quad-core machine means half of the computer’s processing power is in use.
Note:
DJUCED expects that the audio thread always gets the highest priority and doesn’t get interrupted.
When CPU audio thread is too high, DJUCED can slow down the interface to recover some processing.
Tips: Always think to disable third-party applications on your computer when mixing. (Ex: Anti-Virus Scan, Communication software…)
Reducing sampling rate and manage a decent ASIO buffer (windows only) avoid audio issues, as explained in our optimisation guide.
4.11.FULL SCREEN
Turn DJUCED to full screen display
Tips: On Windows systems, always use DJUCED full-screen button, not the system one.
4.12.USER MENU
![]()
Opens the user menu to manage DJUCED:
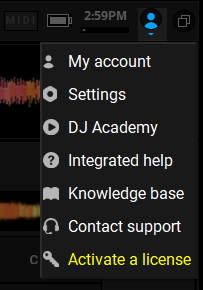
- My Account: Manage your account.
- Settings: Opens the settings configuration panel.
- DJ Academy: Watch the DJ Academy videos.
- Integrated Help: Enable the interactive guide. Move your mouse over areas to get help and tips.
- Knowledge base: Get access to DJUCED online knowledge base.
- Contact support: Hercules technical support.
- Activate a license: Activate your DJUCED PRO or DJUCED PRO+ license.
5.EFFECTS RACK
DJUCED has 2 Effects (FX) Racks. You can assign 3 different FXs per rack.
Each effect can be switched ON and modulated independently.

See Effect Reference
5.1.FX Name

Click on the effect name to open the FX List and choose an effect
5.2.ON Button

For all effects, this button turns the effect on and off.
Some buffer-based effects such as the Delay or the Reverb will continue outputting sound for a certain amount of time even after turning them off.
5.3.Parameter Knob

This knob changes the time parameter or the depth of the selected FX.
DryWet: For all effects, this parameter controls the mix between the original direct signal (Dry – full-left position) and the processed effect signal (Wet – full right position).
5.4.Dry Wet

For all effects, this parameter controls the mix between the original direct signal (dry – full-left position) and the processed effect signal (wet – full right position).
5.5.MacroFX

The MacroFX function controls all the three effects together.
Configure the limits of each effects by clicking the assign button and use the sliders.
5.6.Deck Assign 1-2-3-4-M

To fully enable or disable the action of the effects on a specific channel, use the Deck Assign buttons (button 1, 2, 3 or 4)
To enable or disable the action of the effects on the MASTER output (the effects will be applied to full mix, not only to selected decks) use the Master Assign button ‘M’.
5.7.Effect Reference
DJUCED gives you the following effects (FX) in two “FX Racks”.
5.7.1.Gate
The Gate rhythmically mutes parts of the audio at adjustable rates, from 1/2 Beat to 1/16 Beat
The Master Clock controls the rate and the moment in time of muting.
For the Gate to match the beats in the music, your tracks must have well-aligned Beatgrids.
Tip: -1/2 Beat value is great to remove Kick sounds.
5.7.2.TransDelay
The TransDelay effect is the contraction of « Transition » and « Delay ».
TransDelay uses a 3/16 Delay synced to the Master Clock.
The Knob controls the amount of Feedback from 0% to 100%
TransDelay is a post-fader effect.
Tip: TransDelay helps to make an easy transition at its maximum feedback.
5.7.3.FadeToGrey
The FadeToGrey effect combines multiple filters + a Delay with a huge Feedback.
The more amount of effect you use, the more the song will Fade Out into the Delay.
FadeToGrey is a post-fader effect.
5.7.4.BeatDelay
The BeatDelay is a Delay synced on the Beat, with big feedback.
The Knob controls the Delay Rate, from 1/16 Beat to 4/4 Beat, distributed equally over the range of the knob.
BeatDelay is a post fader effect.
5.7.5.Flanger
A Classic Flanger with tempo-based and free-running rate control and stereo phasing.
Adjust the Rate from 8 Bars to 1/16 Beat, distributed equally over the range of the knob.
5.7.6.Phaser
A Classic Phaser with tempo-based and free-running rate control and stereo phasing.
Adjust the Rate from 4 Bars to 1/16 Beat, distributed equally over the range of the knob.
5.7.7.PeakFilter
PeakFilter is an EQ Effect creating resonance on a frequency.
The Knob adjusts the Frequency from 250Hz to 8200Hz
5.7.8.Reverb Plate
Classic Reverb with medium room size.
The Knob controls the Wetness of the Reverb.
Reverb Plate is a post-fader effect.
5.7.9.Reverb Hall
Classic Reverb with huge room size.
The Knob controls the Wetness of the Reverb.
Reverb Hall is a post-fader effect.
5.7.10.Bitcrusher
Bitcrusher decomposes the music by reducing its bit depth and the sample rate.
The Knob controls the amount of Bit Reduction, up to a 100% digital signal destruction.
5.7.11.Chorus
A Classic Chorus with tempo-based and free-running rate control and stereo phasing.
Adjust the Rate from 8 Bars to 1/16 Beat, distributed equally over the range of the knob.
5.7.12.LPFilter
LPFilter is a filter that passes signals with a frequency lower than a selected cutoff frequency and attenuates signals with frequencies higher than the cutoff frequency, with a subtle analogue sounding resonance.
The Knob controls the cutoff frequency from 20KHz to 100Hz
5.7.13.HPFilter
HPFilter is a filter that passes signals with a frequency higher than a selected cutoff frequency and attenuates signals with frequencies lower than the cutoff frequency, with a subtle analogue sounding resonance.
The Knob controls the cutoff frequency from 80Hz to 5000Hz
5.7.14.Echo
Echo is a Delay synced to the Beat, with a dry Feedback.
The Knob controls the Delay rate from 1/32 beat to 1 beat
Echo is a post-fader effect.
5.7.15.PhoneVOX
PhoneVOX is an effect that uses multiple parametric EQ to give a telephone or megaphone effect.
The Knob controls the Frequency range, from Medium to High.
5.7.16.DubDelay
This kind of Delay was very popular in the 60s, used with « Tape Delays » from Jamaican Dub music.
DubDelay uses a 3/8 Beat Delay synced to the Master Clock.
The Knob controls the amount of Feedback from 0% to 100%
DubDelay is a post-fader effect.
Tip: DubDelay helps to make an easy transition at its maximum feedback.
5.7.17.Washout
Washout is a 1 Beat Loop recorder that re-inject the sound into a Delay and a High-Pass Filter.
Activating the Effect record the Loop into the Buffer.
The Knob controls the amount of Feedback and Filter.
Washout is a post-fader effect.
5.7.18.NoiseJet
NoiseJet effect adds the famous noise.
Only available with DJUCED PRO or DJUCED PRO+ license.
5.7.19.LaserJet
The space laser sounds. Either monophonic or with stereo pan.
Only available with DJUCED PRO or DJUCED PRO+ license.
5.7.20.No Effect
No Effect is an empty effect.
It can be useful if you use the « Macro FX » feature.
6.HIGH RESOLUTION WAVEFORMS
Visually represents a localized view of the loaded track.

Waveforms zoom levels can be adjusted on with the “+” and “-” signs on the right.
6.1.Colors
The brighter color shade represents higher frequencies, while the darker color shade represents lower frequencies.
For example, Kick Drum or Bass Sounds are RED/ORANGE, High Hats or Vocal sounds are YELLOW/GREEN/BLUE.
6.2.Beat grid
DJUCED High Resolution Waveform display shows the beat grid in a white line which is generated when the music file is added and analyzed (Beat Grid).

The Beat Grid is the foundation for setting perfect Loops, Slicer, BeatJumps, Hotcues and synchronized FXs.
Beat grids act as a visual reference for the DJ in showing a visible tempo for a track.
The beats at the beginning of measures are indicated on the beat grid as a red mark (in GREEN in above picture) and the other beats are indicated as a white mark (in YELLOW).
Measures and beats counter (in RED) is available near the play head.
Tips: The beat grid can be adjusted in the ‘Prepare’ mode or in the grid editor.
6.3.Play head
The play head is the Vertical Bar at the Middle of the Waveform. It represents the current location being played within the selected track.
Each Track have its own play head superimposed with others.
Play head is WHITE when a track is playing, or in pause on the CUE point. Play head is RED when the track is paused and not on the CUE position.
6.4.Waveform's Overlays
Waveforms have colored overlays for LOOPS (Blue), SLICER (Green). The waveforms have colored markers for HotCues (Red), CueLoops (Green), CUE (Orange Triangle)
6.5.Keyboard Shortcuts
+Arrows+ to navigate in the browser.
+s+ to turn scratch (vinyl) mode ON/OFF.
+SPACE BAR+ to switch to full-browser view
7.DECK
The deck represents the media to be played.
It can be a track deck, a sampler deck or an external source.
7.1.DECK SELECTION
![]()
The deck selection menu allows you to change the type of Virtual Deck.
- Track Player: Switches to a normal Track Player
- Grid: Transform the pad area of the Track Player to the Beat Grid editor. You also have full access to beat grid editing in the ‘Prepare’ mode.
- Multilayer Sampler: Switches the Track Player to a Multiplayer Sampler Deck”
- External Source: Switches the deck to the external source defined in the audio settings preferences (available only if the deck has been selected in the audio settings).
7.2.DECK HEADING
![]()
The Deck Heading displays information about the loaded track or sample pack.
- Track Title: displays the currently loaded track Title
- Artist Name: displays the currently loaded track Artist Name
- Remaining/Elapsed Time: displays the Remaining or Elapsed time of the playing track (click to switch between)
- Cover: displays the currently loaded track/sample pack cover image
7.2.1.MUSICAL KEY
![]()
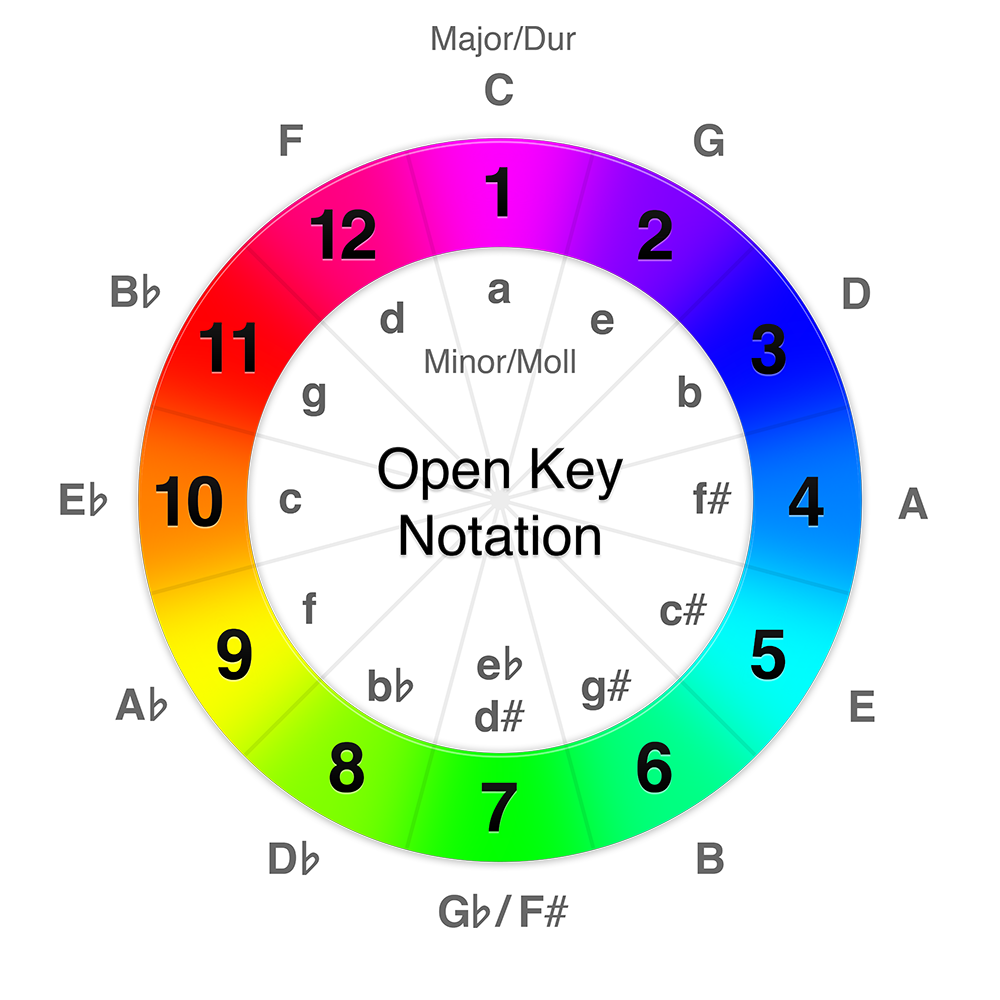
Displays the Key of the currently loaded track.
The Key is displayed when the track has been analyzed by DJUCED.
By Default, the Key is displayed in Open Key Notation.
With Open Key Notation, consider that mixing two tracks with the same will result has an Harmonic Mixing.
Mixing with +1 or -1 Key Number Difference still sounds well.
The letter m is for “moll/minor” , the letter d for “Dur/Major”.
Harmonic Mixing Example: 3m/3d, 1m/2m, 12d/1d
7.2.1.1.Key Changing Arrows
Changes the Key of the track by clicking the arrows.
DJUCED limits key tuning of +/- 12 semitones (two octaves) to keep perfect sound quality.
7.2.2.SYNCHRONIZATION AREA
![]()
- MASTER Button: Defines the Deck as tempo master for syncing.
- SYNC Button: Synchronizes the current deck to the tempo master. In this case, the Tempo cannot be changed.
- Phase Meter: DJUCED Phase Meter indicates the amount of divergence of the bars and beats with the master player when using the sync function.
- Beat LEDs: The Top (Orange) Beat Leds are the MASTER player. The Under Beat Leds are the current deck.
Tips: Changing the tempo Master value changes all the synchronized decks at the same time.
7.3.TRACK DECK
The track deck is used to play music tracks (files).
7.3.1.GLOBAL WAVEFORM

Displays the entire track’s waveform loaded onto the deck.
CUE, HOTCUES and CUE LOOP are also displayed.
Under the waveform, the assistant suggests you “Mix In” and “Mix Out” area of a song with white horizontal bars. These areas are suggestions of places where you should perform transition between tracks. The Smartmix uses these areas to mix from one track to the next one.
Click on this waveform to move the play head to the desired track position.
Tips: The colors indicate the type of sound. Red for Bass frequencies, Orange for Mid frequencies, Yellow for High frequencies.
Amplitude: Little Amplitude means the part of the track is quiet.
Big Amplitude means the part of the track is loud.
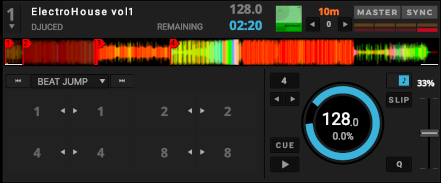
7.3.2.VIRTUAL JOG
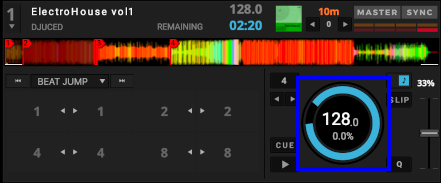
Virtual Jogwheel Platter Ring: The Outer Blue Ring indicates the relative position of the Virtual Jogwheel platter.
One rotation of the Ring corresponds of one Jogwheel platter rotation.
The jogwheel also indicates the track status. It is filled with red while the track is loading, then it is filled with blue while the track is getting analyzed. Once the track is fully analyzed and ready to play the jogwheel remains blue.
BPM: Indicates the Tempo value in Beat Per Minutes (BPM). The BPM value changes related to the Tempo Slider position.
Percentage: Percentage value under the BPM displays the percentage with the BPM is modified. When this value displays 0%, the track is playing as its original speed.
7.3.3.KEYLOCK - SLIP – QUANTIZE
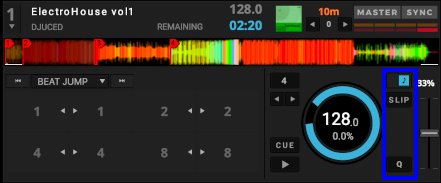
- Keylock: When Keylock is enabled, the song will keep its original key when Tempo is changed. When Keylock is disabled, the song will change the pitch of the song when Tempo is changed. The Keylock algorithm of DJUCED allows extreme tempo changes, without losing the original tone.
- Slip: Slip mode enables scratching, looping and hot cueing without breaking the rhythm of the track. When SLIP is engaged, the global waveform to split horizontally. The upper part of the waveform represent the play-head position, the lower part of the waveform represents the SPLIP position (where the playback will resume once the SLIP is done).
- Quantize: Quantize enables CUE, LOOP and HOTCUE to be automatically triggered on tempo.
Note: Do not confuse Quantize and SNAP. Quantize works when you use a function.
To force the position of CUE points or loops, use SNAP.
7.3.4.TEMPO FADER
DJUCED Tempo Fader offers the same functionality as any standard DJ turntable or media player.
Lots of Tempo ranges are available to suit all the DJs preferences.
7.3.4.1.Tempo Fader
Moving the Tempo Fader up or down will slow down or speed up the tempo of the track.
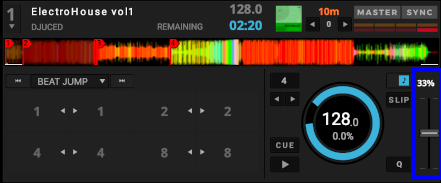
7.3.4.2.Tempo Range
Clicking on the tempo range number change the tempo range of all the decks.
Available values are: 6%, 8%, 10%,12%,16%, 20%, 25%, 33%, 50%, 100%.
Applying a -100% stops the track.
Tips: By default DJUCED automatically set the perfect tempo range to mix tracks when a track is loaded. This can be disabled in the settings.
7.3.5.TRANSPORT
![]()
Transport section includes Play/Pause and CUE Buttons.
- Play/Pause: Click the Button to Play/Pause the loaded track.
- CUE
- Click the CUE button during pause: a CUE point is set to the current track position. (Orange Triangle Under Waveform)
- Long click CUE button: the playback continues while the button is clicked.
- Click the Cue button while playing: the playback stops and the play-head position returns to the position of the CUE point.
Tips: Most of the DJs all over the world always put the CUE point on the first downbeat of the track. It allows you to start the song at the right moment, or to go back to this downbeat really fast.
CUE point is saved into the MP3/AAC/M4A/WAV files and in DJUCED database.
7.3.6.LOOPS
DJUCED integrates 2 Loops Behaviors.
You can switch between these two behaviors by clicking on the loop size area.

7.3.6.1.Automatic Loop
Default loop mode.
- Arrows: adjust Loop Size by Beat Division
- Button: Loop ON/OFF
Automatic Loops allow perfect loop length.
7.3.6.2.Manual Loop
- IN: set IN Loop point
- OUT: set OUT Loop point
- Arrows: divide/multiply Loop Length by 2
Snap ON (in the Settings): the loop points are automatically set to the nearest beat grid markers.
7.3.6.3.Loop Adjust
With the controllers supporting it (Hercules Inpulse 500 for example)
Pressing the LOOP IN button on the controller when a loop is active adjusts the start point of the loop by turning the jog wheel. Press LOOP IN again to exit the modification.
Pressing the LOOP OUT button on the controller when a loop is active adjusts the end point of the loop by turning the jog wheel. Press LOOP OUT again to exit the modification.
Press the controller’s loop rotary button to exit the loop.
7.3.7.PERFORMANCE MODES
DJUCED integrates 4 Performance modes to enhance your mix.
7.3.7.1.HOTCUE CUELOOP
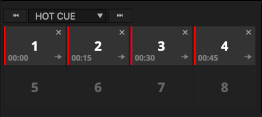
Creating Hotcues:
Pressing an unlit Hotcue button, if there is no loop active, stores a Cue Point at the current playback position (the HOTCUE button turns red).
Pressing an unlit Hotcue button, if there is a loop active, stores a loop at the current playback position (the HOTCUE button turns green). The CUELOOP saves the CUE position and the loop size. When called the playback jump to the CUE position and the LOOP is activated.
Tips: With Snap ON, Hotcues are set on the nearest Beat grid marker.
Tips: With a right-click on a Hotcue button, you can change the Hotcue color or name.
Recalling Hotcues:
If Deck is on Pause:
- Pressing a Hotcue button plays the song but releasing it stops the playback and goes back to the Hotcue.
- Pressing a Hotcue button + Play button will continue the playback.
If Deck is Playing, pressing a Hotcue button will jump on it and continues the playback.
Deleting Hotcues:
Press on the cross on the top right of an HOTCUE button delete Hotcue.
Saved Loop
One CUELOOP can be turned to a SAVED LOOP.
Right click on a CUE LOOP and select “Set Saved loop”. A SAVED LOOP is a loop set anywhere in the track. It is very useful to set a security loop before the end of a track.
7.3.7.2.LOOP ROLL
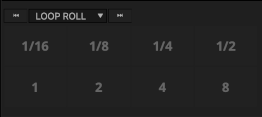
Pressing one of the 8 buttons performs an Auto Loop, but when the loop is turned off, the playback position returns to the position it would have been if nothing had been done.
It allows to make from 1/16 to 8 beats loops and “stutter” effects without losing the phrase of the track.
Tips : The waveform is horizontal cut, so you can see the playback position within the loop roll (in the top) and the resume (out of the loop) position (in the bottom).
7.3.7.3.SLICER
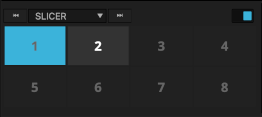
The Slicer Mode divides an active loop into 8 Slices.
Slices can be triggered in real time, and allow you to jump between different sections of an active loop. Once a slice is triggered, looping will begin within the selected Slice for as long as the pad is depressed. Playback continues within the active loop area until the loop is exited.
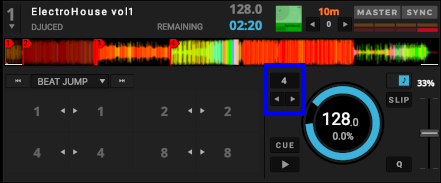
7.3.7.4.BEATJUMP
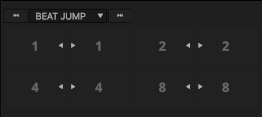
BeatJump allows to Jump from a perfect Beat value, backward or forward. Perfect for re-catching a phrase. Press a button to jump from 1 to 8 Beats.
7.3.7.5.STEM
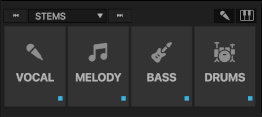
DJUCED Stems uses a machine learning algorithm that allows you to isolate different parts of a song : vocal, melody, bass and drums, or just instrumental and vocal parts, to make mashups and/or your own live remixes.
As STEMS uses machine learning algorithm calculation, it requires a modern powerful CPU/GPU combination and more RAM Memory to work flawlessly.
Also, the computer needs to be up to date to the latest Operating System version, and well optimized.
- On top right, select either vocal (accapela) or instruments
- On the PAD turn ON/OFF the vocal, melody (guitar, piano, …) bass and drums.
- On the bottom right of each pad a indicator lights shows the analysis state: Red the STEM are not ready, blue when the STEM are ready.
By default, STEMS will start analyzing only when you ask for a STEMS functions.
You will be able to see the progress of the analysis with the discrete 1 pixel blue bar under the global waveform. When the analyze is done, the bar disappears.
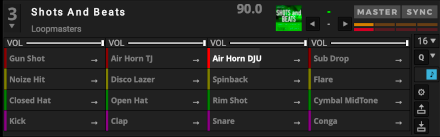
7.4.MULTILAYER SAMPLER
DJUCED multilayer sampler extends the creativity.
Use one shot samples or perfect synchronized loops to overlay and personalize your mix.
DJUCED proposes 4 samplers per deck, with maximum 4 layers each.
Each sampler can be volume controlled.
To guarantee no latency samples, the samples are limited to 30 seconds.
On the right side, choose between 16/8/4 samples display layout.
After making a loop, drag’n’drop the Deck Heading of the track from a Player deck to extract this loop.
7.4.1.Playback modes:
- One shot: Play when pressed, restart when pressed again
- Hold: Play when pressed, stop when released
- Toggle: Play when pressed, stop when pressed again
In all the modes, the samples can be looping or not.
7.4.2.Quantization
Quantization (Q): choose between 1/4 to 32 Beats quantization value for the whole deck, or deactivate. (default 1 beat). When you click on a pad/press a pad on a controller with quantization, the action is done on the tempo division.
7.4.3.Keylock
Musical note symbol button.
Enable/Disable Keylock.
When keylock is enabled the track’s tone is preserved when the pitch is changed. When it is disabled the tone change with the pitch, like it will do on a vinyl turntable.
7.4.4.Sample Pack Editor
Click on the gear on right of the sampler to opens the Sample Pack Editor.
Organize, change colors, rename samples and adjust BPM.
7.4.5.Save/Export
Save into Song Library for futur use or Export Sample Packs to a .djz file to share or move to another computer
7.5.GRID MODE
DJUCED analyses every track loaded into a deck (Tempo and Key), then automatically set a Beat Grid.
To ensure the best benefits of the Beat FXs, Loops, Slicers and other performances tools, the Beat Grid needs to fit perfectly the track loaded into the deck.
Grid mode allows correcting a mis-detected beat grid manually.
Tips: The beat grid edition is also fully available in the ‘Prepare’ mode along with cue points editing and loop tests.
7.5.1.SET FIRST BEAT
Sets the first beat grid at current playback position.
Tip: Setting the first beat grid is also useful to put the first beat counter to 1.1 Bars.
7.5.2.MOVE BEAT GRID
Moves the whole beat grid to the left or right side, with slow or fast steps.
7.5.3.SHRINK/EXPAND BEAT GRID
- Buttons: Shrink or Expand the Beat grid from the First Beat position.
- BPM Window: Enter a BPM value manually.
Tips: Before using Shrink/Expand buttons, always set the first beat on the downbeat of the track.
Shrink/Expand changes the Tempo by 1 BPM steps.
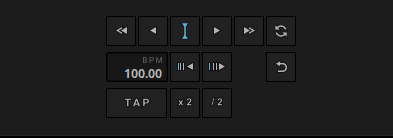
7.5.4.TAP BPM - HALF/DOUBLE
- Tap: Tap the BPM by clicking on rhythm with your mouse, or use the ‘B’ key.
- Half/Double BPM: Allows to quickly Divide or Multiply the BPM by 2.
Tips: Did you know that you can choose a BPM range for a better analysis in DJUCED settings?
7.5.5.REANALYZE - UNDO
- Reanalyze: Force DJUCED to analyze the BPM and the Key of the current loaded track.
- Undo: Undo the last action.
8.MIXER
The mixer is the center of DJUCED.
It’s the place where all the sounds coming from the decks are mixed together.
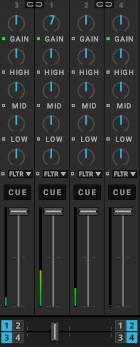
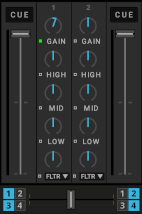
8.1.GAIN
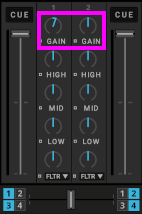
Controls the pre-fader level of the selected channel.
DJUCED offers a powerful Autogain function enabled by default.
Deactivate Autogain by clicking the button.
Tips: On controllers with hardware gain knobs, the autogain is disabled by default.
8.2.3- BAND EQUALIZER
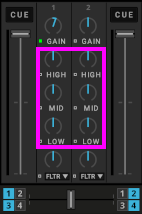 The Equalizer adjusts the sound of your decks according to the frequency. It is an important mixing tool, because it helps to manipulate the sound.
DJUCED 3-Band EQ emulates classic DJ Mixer frequency range.
- HI: cut or boost high frequencies (ex: Hi-hats, Rides)
- MID: cut or boost medium frequencies (ex: voices, guitars, chords)
- LOW: cut or boost bass frequencies (ex: bass, kick drum, subs)
Each band has a button “kill” next to the knob to cut this frequency.
The EQ profile can be selected in the settings. By default DJUCED EQ range is from -24db to +12bd. Isolator cuts the whole band (-96db to +12bd)
8.3.DUAL FILTER - FILTER FX
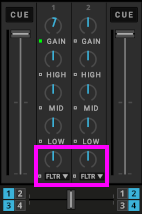
In Middle position the Filter is inactive.
Turning the knob to the right activate a high-pass filter (cutting the low and middle frequencies).
Turning the knob to the left activate a low-pass filter (cutting the high and middle frequencies).
The dual filter knobs can be switched to a Filter/FX. Filter FX are complex combination of dual filters and effects. Up to four Filters/FX are available at a given time. The available Filter/FX can be selected in the ‘Mixer’ settings.
8.3.1.FILTER FX REFERENCE
DJUCED gives you easy to use, one-knob Filter Effects located in the mixer channels.
The Filter FXs are designed for one-knob left and right modulations with big-sounding results, to offer you the same sensations you will find on Professional Club and Festival setup.
Choose from 16 effects and assign four of them to each channel, in addition to DJUCED Deck FX, and the Dual Filter.
8.3.1.1.FadeToGrey
FadeToGrey is a post-fader effect that combines a Low-pass Filter, a High-pass Filter, and a Tempo-synced Delay with a Huge Feedback.
It is the perfect effect to make a progressive fade from a track to another, even if the part of the song is loud.
Left side: Applies a Low-pass Filter and drowns progressively the signal into the Delay.
At the maximum rotation, you can ear only the Delay feedback.
Right side: Applies a High-pass Filter and drowns progressively the signal into the Delay.
At the maximum rotation, you can ear only the Delay feedback.
Use it to create: Transition, Breakdown
8.3.1.2.Flanger
A Classic Flanger with tempo-based and free-running rate control and stereo phasing.
Left side: Applies a Flanger and a discrete Low-pass Filter.
Right side: Applies a Flanger and a discrete High-pass Filter.
Flanger No Filter: only the flanger without the High-pass or Low-pass filters, only available with DJUCED PRO or DJUCED PRO+ license.
Use it to create: Sound colorization, Classic effect
8.3.1.3.TimedGate
TimedGate is a Rhythmic effect.
It has been made to create tension and build-up in your DJ set, especially before a drop.
Left side: Applies a discrete Low-pass Filter + a Tempo-synced Gate.
Right side: Applies a discrete High-pass Filter + a Tempo-synced Gate.
Use it to create: Tension, Build Up, Rhythm
8.3.1.4.Reverb
Reverb is a post-fader classic reverb with a big decay time.
It is a powerful effect to progressively drown the signal into another atmosphere.
Left side: Applies a discrete Low-pass Filter and drowns progressively the signal into the Reverb.
At the maximum rotation, you can ear only the Reverb ambiance.
Right side: Applies a discrete High-pass Filter and drowns progressively the signal into the Reverb.
At the maximum rotation, you can ear only the Reverb ambiance.
Reverb No Filter: only the reverb without the High-pass or Low-pass filters, only available with DJUCED PRO or DJUCED PRO+ license.
Use it to create: Breakdown, Sound colorization
8.3.1.5.Key
Key allows you to change the Key of the signal, from one octave up or down.
Left side: Changes the Key down by semitones, to one octave.
Right side: Changes the Key up by semitones, to one octave.
Use it to create: Sound colorization, Tension, Key matching
8.3.1.6.KeyDelay
KeyDelay is a post-fader effect that changes the Key of the signal, from one octave up or down, and send it to a Tempo-synced Delay.
Left side: Changes the Key down by semitones, sends the signal to a Delay, and applies a discrete Low-pass filter.
Right side: Changes the Key up by semitones, sends the signal to a Delay, and applies a discrete High-pass filter.
Use it to create: Tension, Transition, Breakdown and Build-ups
8.3.1.7.PitchFade
PitchFade is a post-fader effect similar to the FadeToGrey that creates a Pitch shifting effect that drowns into a Tempo-synced Delay with a Huge Feedback.
It is the perfect effect to make a tension fade from a track to another, just before a drop.
Left side: Changes the Key down by semitones, applies a Low-pass Filter, and drowns progressively the signal into the Delay.
At the maximum rotation, you can ear only the Delay feedback.
Right side: Changes the Key down by semitones, applies a High-pass Filter, and drowns progressively the signal into the Delay.
At the maximum rotation, you can ear only the Delay feedback.
Use it to create: Tension, Transition, Breakdown
8.3.1.8.ShortReverb
ShortReverb is a post-fader classic reverb with short decay time.
Left side: Applies a discrete Low-pass Filter and drowns progressively the signal into the Reverb.
At the maximum rotation, you can ear only the Reverb ambiance.
Right side: Applies a discrete High-pass Filter and drowns progressively the signal into the Reverb.
At the maximum rotation, you can ear only the Reverb ambiance.
ShortReverb No Filter: only the reverb without the High-pass or Low-pass filters, only available with DJUCED PRO or DJUCED PRO+ license.
Use it to create: Breakdown, Sound colorization
8.3.1.9.NoiseJet
NoiseJet is a noise generator effect.
It mixes the deck signal with a White Noise generator, in a combination of a Dual Filter.
It is possible to use NoiseJet without music playing.
Left side: Generates a White Noise effect and applies a Low-pass Filter.
Right side: Generates a White Noise effect and applies a High-pass Filter.
Use it to create: Sound colorization, Classic effect, Breakdown
8.3.1.10.DubDelay
DubDelay is a post-fader effect, this kind of Delay was very popular in the 60s, used with « Tape Delays » from Jamaican Dub music.
DubDelay uses a 3/16 Beat Delay synced to the Master Clock.
Left side: Sends the signal into a Dub Delay and applies a Low-pass Filter.
Right side: Sends the signal into a Dub Delay and applies a High-pass Filter.
DubDelayNo Filter: only the delay without the High-pass or Low-pass filters, only available with DJUCED PRO or DJUCED PRO+ license.
Use it to create: Transition, Breakdown, Build-ups
8.3.1.11.Delay
Delay is a post-fader effect, with a feedback amount controlled by the Knob.
Left side: Sends the signal into a 1/4 Delay, controls the feedback, and applies a Low-pass Filter.
Right side: Sends the signal into a 1/8 Delay, controls the feedback, and applies a High-pass Filter.
Delay No Filter: only the delay without the High-pass or Low-pass filters, only available with DJUCED PRO or DJUCED PRO+ license.
Use it to create: Transition, Breakdown, Classic effect
8.3.1.12.Echo
Echo is a post-fader effect. It’s a 1/4 Beat Delay synced to the Beat, with a dry and Big Feedback.
Left side: Sends the signal into a 1/4 Delay, controls the feedback, and applies a discrete Low-pass Filter.
Right side: Sends the signal into a 1/‘ Delay, controls the feedback, and applies a discrete High-pass Filter.
Echo No Filter: only the echo without the High-pass or Low-pass filters, only available with DJUCED PRO or DJUCED PRO+ license.
Use it to create: Transition, Breakdown, Build-ups
8.3.1.13.BeatRepeat
BeatRepeat is a rhythmic effect, repeating the last beat into the next one.
Left side: Controls the Repeat amount and applies a discrete Low-pass Filter.
Right side: Controls the Repeat amount and applies a discrete High-pass Filter.
Use it to create: Tension, Build Up, Rhythm
8.3.1.14.Ducker
Ducker is a rhythmic effect that simulates the « side chain » technique used in music production.
The side chain technique, with extreme settings, can result in a « pumping » sound, also called a « ducking » sound.
Left side: Controls the Ducking amount and applies a discrete Low-pass Filter.
Right side: Controls the Ducking amount and applies a discrete High-pass Filter.
Use it to create: Tension, Build Up, Rhythm
8.3.1.15.Phaser
A Classic Phaser with tempo-based and free-running rate control and stereo phasing.
Left side: Applies a Phaser and a discrete Low-pass Filter.
Right side: Applies a Phaser and a discrete High-pass Filter.
Use it to create: Sound colorization, Classic effect
8.3.1.16.Gate-Comp
Gate-Comp is two effects in one, that you can find on high-end club mixers.
Left side: Applies a Gated sound synced to the Beat.
Right side: Applies a Compressor.
Use it to create: Sound colorization, Rhythm
8.3.1.17.LaserJet
The space laser sounds. Either monophonic or with stereo pan.
Only available with DJUCED PRO or DJUCED PRO+ license.
8.4.CUE BUTTON
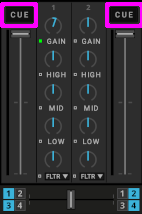
Select which channel to Pre-Listen to your headphones.
8.5.CHANNEL VOLUME FADER

Controls the volume of the channel.
8.6.LEVEL METER
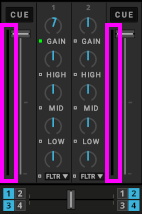
Level meters show the volume before the volume fader. Adjust the GAIN to change the volume before the volume fader.
The level meter turns all red when the sound sutures. Adjust the gain level to correct this.
Tips: always stay away from the red zone in the Level meters.
Tips: With DJUCED PRO or DJUCED PRO+ license you can select segmented meters in the settings.
8.7.CROSSFADER
The Crossfader enables you to make transitions between decks by dragging it from one side to the other.
By default, decks 1 and 3 are heard in the mix when the crossfader is on the left. Decks 2 and 4 are heard when the crossfader is on the right.
Crossfader Assign Buttons: Select which decks are audible on the left and right position of the Crossfader.
Crossfader curves can be changed in the settings. Crossfader can also be disabled in the settings. In this case decks are heard wherever the crossfader is.
Tips: A Deck that is not assigned to one side of the Crossfader is only controlled by the Channel Fader.
![]()
8.8.HEADPHONE CONTROLS
- Mixing: This Knob lets you mix the cued signal with the master signal in your headphones. Left position is CUE (preview), right position is MASTER (mix output).
- Level: Level Knob controls the volume of the Monitor output for your headphones.
Tip: If your controller has a hardware volume control of headphones, DJUCED automatically set headphone level to the maximum and disable headphone control.
8.9.RECORDING PANEL
- Rec button: Starts and stops recording of the mix.
The recording can be saved in an uncompressed format (WAV), compressed (Ogg Vorbis format).
Tip: The compression quality can be adjusted in the Recording settings.
9.BROWSER
The browser allows you to browse through the media sources and select the files you want to load on the decks.
It is composed of 3 parts, from left to right:
- Media sources
- Folders
- Files
The top bar of the browser allows you to change the text’s size with the “+” and “-” buttons and the search for files.
Tips: Click on the magnifier to select the search fields.
You can choose the column that sorts the tracks by clicking on the column heading. You can sort by several columns by click on the columns header while pressing CTRL on your keyboard.
Right-click on a column’s title to display the list of available columns. You can choose the columns that you want to display.
9.1.Media sources
Most left column, shows where to get the media (track, sample) from.
9.1.1.Demos
Demo tracks and sample packs are only available in “Prepare” mode.
- All Demos shows all the demos files either present on the computer or available online.
- Tracks with an arrow icon are available for download.
- Tracks with a folder icon are downloaded.
- Tracks without icons were installed with DJUCED.
- Available Demos shows the demo track and sample pack available online. Click on the arrow icon to download the file on your computer.
- Downloaded Demos shows the demo already downloaded on the computer. Click on the folder icon to remove the file.
9.1.2.Playlist
Manage your playlists.
Playlists allow you to create lists of ordered tracks. As opposed to shortcuts which are links to folders.
You can sort your playlists according to any criteria (Artists, BPM, Key…). The # column returns to the default order. To change this order, you can drag and drop the tracks.
Tips: To fix the current playlist order (for example after sorting it by track titles) right-click on the column title and select “Renumber track order” to reorder the playlist.
The Automix plays the tracks in the playlists in order. The SmartMix plays the tracks in the order determined by the Intelligent Musical Assistant (IMA).
Click on the + sign to create a new playlist.
Right click on a playlist to manage it (export, rename, etc.)
9.1.2.1.All Songs
Shows all the tracks detected by DJUCED and provided with DJUCED.
Click on the gear to:
- Check the library (analyse and clean up the “All Songs” database).
- Analyse the songs in the database.
- Import a folder in the database
- Import an existing library
- Reset played tracks status (played track are displayed in yellow in the browser).
- Reload all tags from the files to update the database
9.1.2.2.Smart playlist
Smart and automatic playlist based on the criteria of your choice.
Click on the ‘+’ sign to add a rule.
The playlist can either match all the conditions (AND) or match, a least, one of the conditions (OR).
9.1.2.3.Demo Songs
Shows the demo tracks provided with DJUCED or downloaded in prepare mode.
9.1.2.4.Export playlist
You can export your playlists and the music they contain, for example, to change computers.
Right click on a playlist to display the menu.
9.1.3.Explorer/Finder
Browse your disks.
9.1.4.Export Rekorbox XML
Export the DJUCED library in XML format for use in Rekordbox.
Click on the gear next to “All Songs “ to open the menu
Only available with DJUCED PRO or DJUCED PRO+ license.
9.1.5.Sampler
Shows the demo sample packs provided with DJUCED, the analyzed samples.
9.1.6.Apple Music
Browse your Apple Music library.
Tips: On PC, don’t forget to allow library sharing in iTunes settings.
9.1.7.Beatport LINK
Beatport is today the worldwide home of electronic music for DJs.
Connect to your Beatport LINK account and get access to:
- User playlists
- Top 100 playlist
- Curated playlist
- Playlists by genre
9.1.8.SoundCloud Go+
SoundCloud Go+ gives you offline and ad-free listening to everything from mainstream releases to DJ sets and remixes.
Discover and mix millions of underground and premium tracks with DJUCED and SoundCloud Go+.
Get access to:
- Free DJ Playlist,
- Trending charts,
- Your Stream,
- Your playlists
9.1.9.TIDAL
TIDAL is the first global music streaming service with high-fidelity sound, hi-def video quality, along with expertly curated playlists and original content — making it a trusted source for music and culture.
Connect to your TIDAL account and get access to:
- Search TIDAL catalog
- TIDAL Home
- Tracks by Genre, Moods
- TIDAL Rising
- My Collection
9.1.9.1.Offline
DJUCED allows you to manage tracks offline (without a connection) with TIDAL.
Right click on a track to download it. Offline tracks are visible on TIDAL playlists.
Only available with DJUCED PRO or DJUCED PRO+ license.
9.1.10.Recording
Browse recorded tracks and samples
9.1.11.History
Find played tracks by year/month/day
9.1.12.Favorites
Favorites is a place where you can drag’n’drop music folders from your hard drive, just like a crate, or add any playlist by right-clicking on it.
If you drop a Folder containing Subfolders, DJUCED will keep the organization.
If you add new songs to your folders, DJUCED will refresh the Favorites.
Note that it is not possible to organise the order of the songs in Favorites.
9.2.Files
The file list shows the tracks from the selected media source.
You can sort the track by any column. To move a column, click on the column title and drag it to the new place.
To select the visible columns, right-click on a column title and select the wanted columns.
By default the track icon column shows the source of the track (hard drive, Apple Music, Beatport, TIDAL, …). The track status column shows if a track is already analyzed and when a track is loaded on a deck.
9.2.1.Auto HotCue (DJUCED PRO/PRO+ only)
Right-click on a song in a playlist, choose “Analyze => AutoHotCue” to put Hotcues calculated by Artificial Intelligence. (see pic)
Auto-HotCues will be named “Auto XX” (XX= number of Bars to the next phrase). The Last Auto Hotcue will always be named ‘Outro’. (see pic)
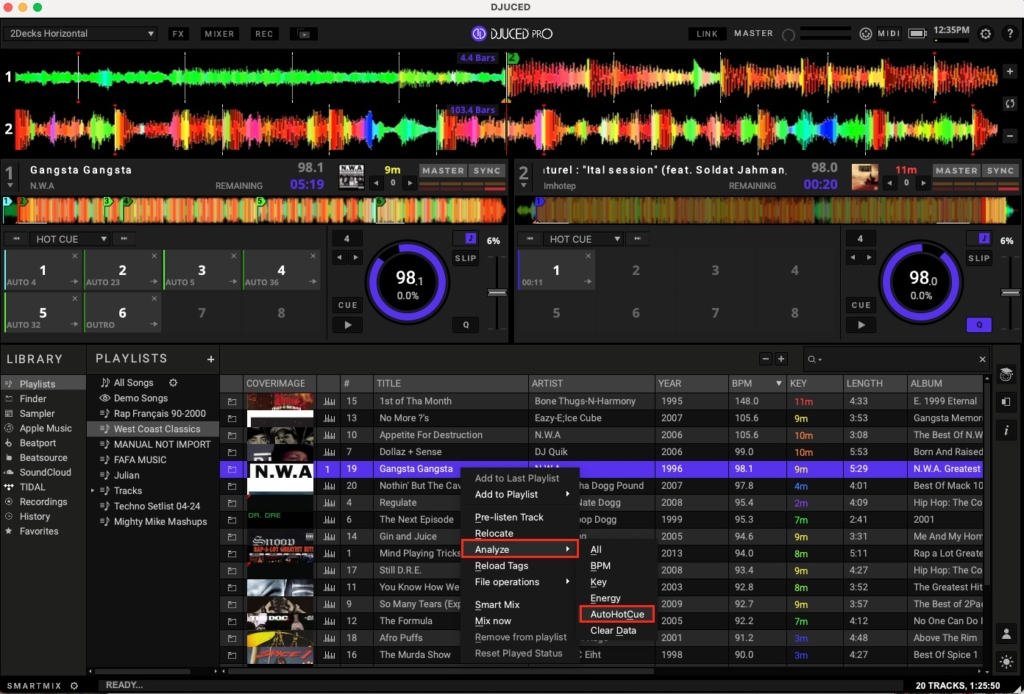
Note: It is possible that music that has been analysed from an older DJUCED version may not display Auto Hotcues. Reanalyze the song to rectify this issue by Right-Clicking => Analyse => All
10.SMARTMIX & AUTOMIX
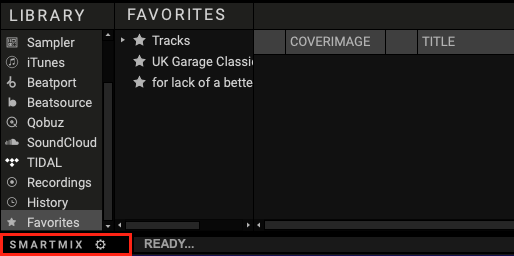
Activate the bottom left button on DJUCED interface to use SmartMix or Automix.
(Clic the gear button to switch between the 2 modes of auto mix).
SmartMix is available in all folders/playlists/fav0rites : the song selection uses the Intelligent Music Assistant to find the songs that have the correct BPM, Key and Energy.
Automix only works in playlist and follows the playlist order.
Tips: Adjust fade duration in the Settings => Mixer.
Tips: Smartmix uses the ‘MixIn’ and ‘MixOut’ area to mix between track. You can disable this in the general settings.
11.FAST ACCESS BUTTONS
Direct access to essential ingredients.
11.1.DJ Academy
Integrated DJ Academy to discover your DJ controller and software. Get DJ lessons in DJUCED, or get tips and tricks from our DJs.
Click on the “teacher” icon to open the DJ Academy.
11.2.Intelligent Music Assistant
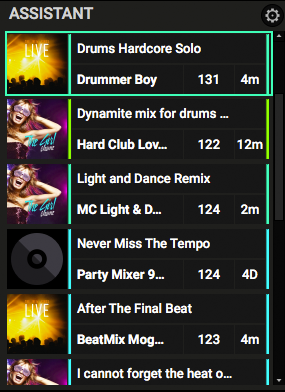
Immediately see a list of the best songs to mix.
Click on the Assistant icon on DJUCED or click on the ASSISTANT button on your controller to open/close Intelligent Music Assistant.
On your controller, change the Assistant Energy parameter to master the mix danceability.
Tips: Using the gear, you can open the Assistant settings: source; number of tracks to display; search target; use of Energy.
11.3.Track Info
Display and edit selected track information.
11.4.My DJUCED
Access to your essential information about DJUCED and your controller.
12.SETTINGS
The settings allow you to customize DJUCED to your own taste and mix habits.
12.1.Audio
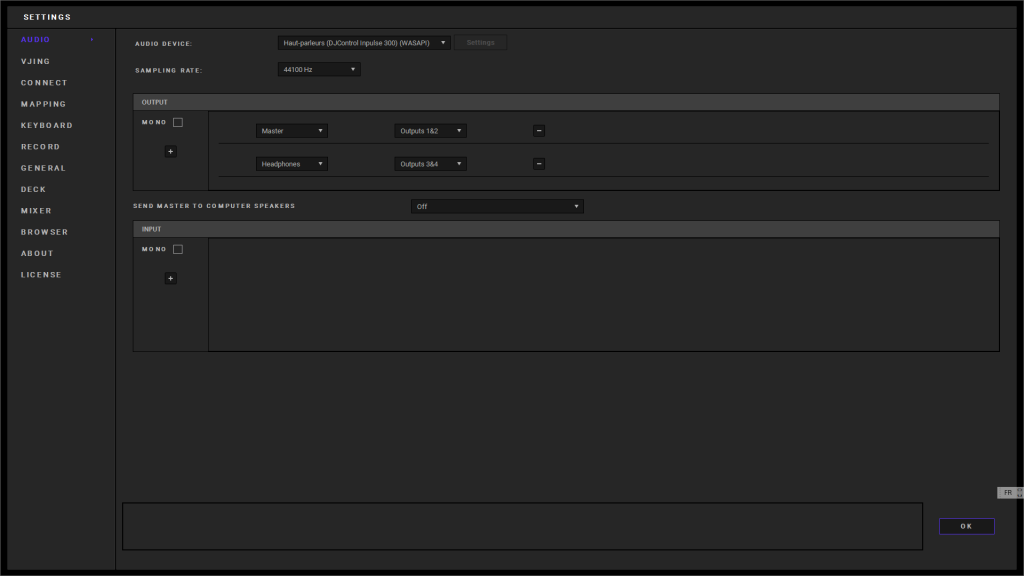
The Audio settings menu allows you to select the following elements:
- Audio device
- Sampling rate
- Input and output channels
- Send MASTER to computer speakers
12.1.1.Audio device
Select the audio device by clicking on the downward facing arrow.
12.1.2.Settings
Click on the Settings button to the right of the audio device name to open the audio device’s settings window, if necessary.
12.1.3.Sampling Rate
If your audio device is compatible with several sample rates, you can change this setting.
Tip: Even if your sound card can go up to 96kHz or 192kHz, using it in DJing will not render your sound better, because the musical source you will play is mostly in 44,1kHz or 48kHz (mp3, iTunes music, or streaming sources music).
Oversampling in DJUCED will consume a lot of CPU resources, and can create latency.
So, use 44,1kHz or 48kHz for the best performance. Not less. Not higher.
12.1.4.Input and output channels
Standard settings for an audio interface with 4 input channels and 4 output channels:
Outputs
- Master: Outputs 1 and 2, to connect your speakers.
- Headphones: Outputs 3 and 4, to connect your headphones.
Inputs
- Deck A: Inputs 1 and 2, to connect your first external audio player.
- Deck B: Inputs 3 and 4, to connect your second external audio player.
12.1.5.Send MASTER to computer speakers
Send the MASTER output your computer default sound card to use your computer speakers with the controller headphones.
12.2.VJING
Only available with DJUCED PRO or DJUCED PRO+ license.
- Off: disable the VJING feature to preserve CPU usage.
- Video loops: VJing uses looping videos, created by VJing artists, that sync seamlessly with the tempo and phrasing of your tracks, delivering a dynamic visual experience for your mix automatically.
- Lyrics: Liven up your event and get your audience involved with the Lyrics feature*
*Works with « LyricFind ».
12.2.1.Video Loops
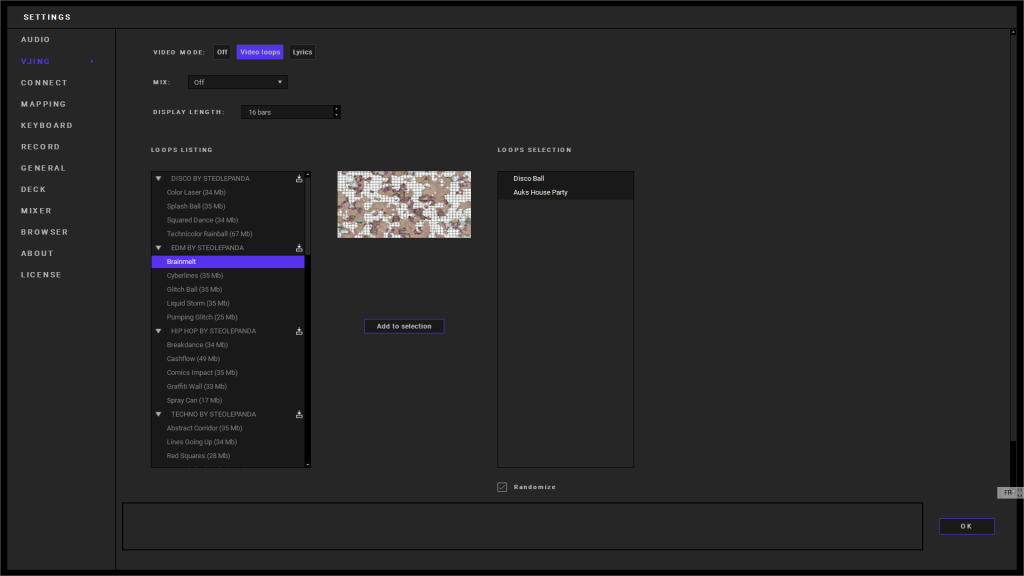
In the left panel, select the video loops. You can download them individually or in a bundle by clicking on the symbol next to the bundle name.
After downloading the loop, it can be incorporated into the selection and will appear on the right-hand panel.
- Mix: Choose how the crossfader and volume controls affect the choice of loops.
- Display Length: select the duration of each loop.
- The loops are played in order by default. Check Randomize to play them randomly.
Only available with DJUCED PRO or DJUCED PRO+ license.
12.2.1.1.Import
Add your own video loop files for more personal VJING. Click on “import” to add a file to the list.
In the selected video list (to the right), a folder icon identifies the local files.
12.2.2.Lyrics
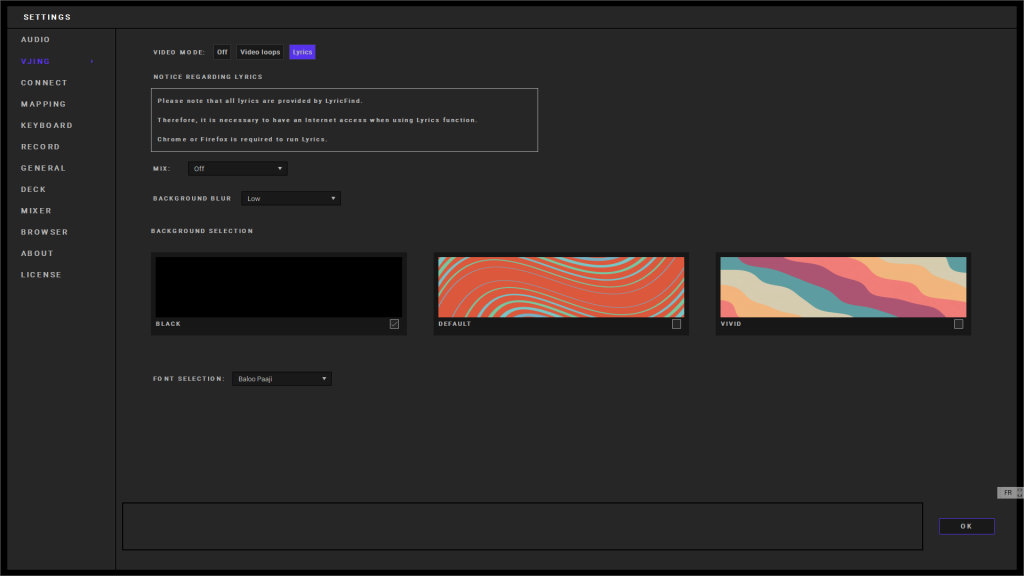
- Mix: Choose how the crossfader and volume controls affect the choice of loops.
- Background Blur: Choose the quality of the background. The highest the quality is, the more is the CPU needed.
- Background selection: choose the animated background for the lyrics.
- Font selection: select the lyric font.
Only available with DJUCED PRO+ license.
Works with « LyricFind » provided to display the lyrics; a permanent internet connection is required.
12.3.Connect
The connect menu allows you to log in to third-party services.
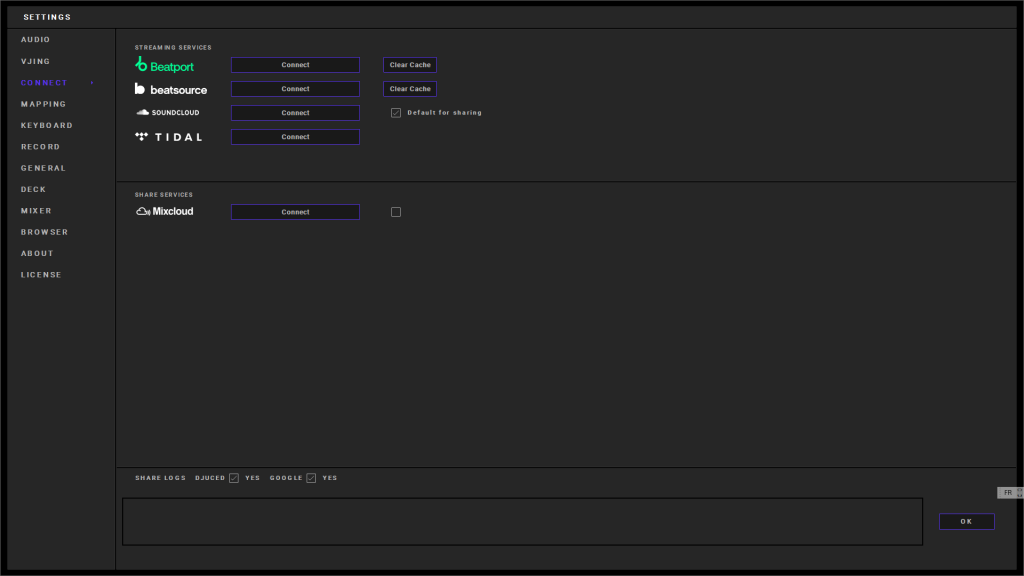
Streaming services
- Beatport Streaming: Beatport is today the worldwide home of electronic music for DJs.
- Beatsource Streaming: Beatsource was created through a partnership between DJcity and Beatport.
- SoundCloud: SoundCloud Go+ gives you offline and ad-free listening to everything from mainstream releases to DJ sets and remixes. You can also share the mixes you record in DJUCED.
- TIDAL: TIDAL is a global music streaming platform bringing fans closer to artists through unique experiences and the highest sound quality.
Share services
- Mixcloud is a platform dedicated to DJ mixes and podcasts. Mixcloud allows you to share the mixes you record in DJUCED.
Click on the service icon to open connection parameters.
Share logs: Help us improve DJUCED by sharing usage statistics.
12.4.Mapping
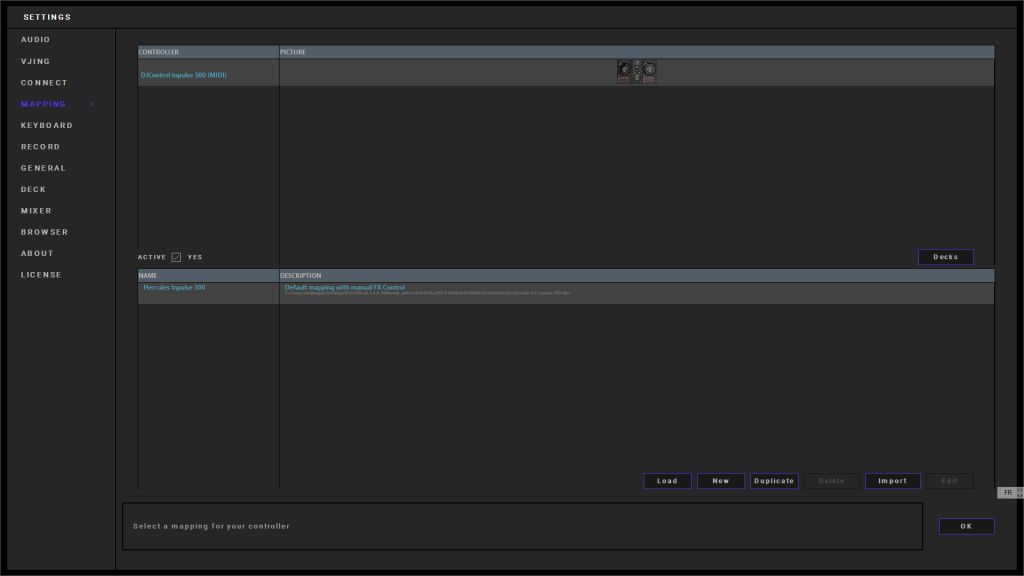
This tab lets you choose the mapping used for your controller. You can also import new mappings by clicking the corresponding button at the bottom of the window.
A mapping is a file describing what DJUCED does when it receives a MIDI command from an external controller.
By changing the mapping, you therefore change the actions that DJUCED performs when a button, fader, etc. moved on the controller.
- Decks: Open the decks selection (DJUCED PRO or DJUCED PRO+ license only).
- Active: Check this box to use the corresponding mapping.
- Load: Loads the mapping.
- New: Create a new empty mapping (DJUCED PRO or DJUCED PRO+ license only).
- Duplicate: Create a copy of selected mapping (DJUCED PRO or DJUCED PRO+ license only).
- Import: Import an existing mapping from your hard drive in the DJUCED folder.
- Edit: Modify the selected mapping (DJUCED PRO or DJUCED PRO+ license only).
DJUCED PRO or DJUCED PRO+ owners : check the MIDI Mapper guide here.
Tips: It’s recommended to restart DJUCED after changing the connected controller mapping.
Tips: If you plug several controllers, don’t forget to activate the one you are using.
12.4.1.Mapping Decks
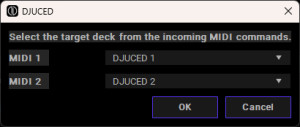
Choose the decks managed by the MIDI controller.
With DJUCED PRO or DJUCED PRO+ license only.
12.4.2.Mapping Edit
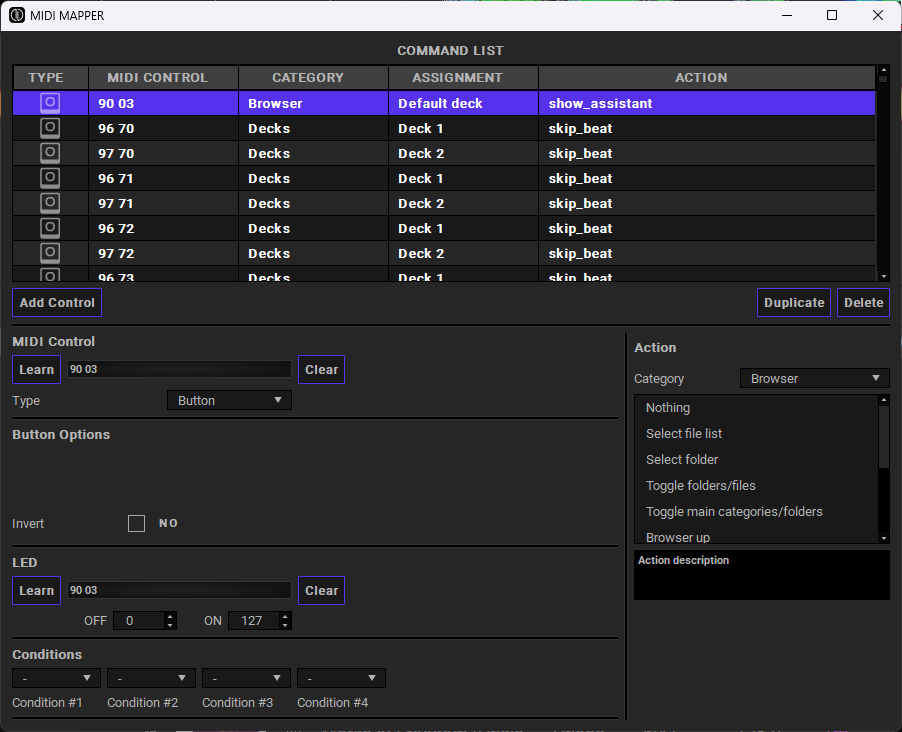
Customize your controller’s MIDI commands.
With DJUCED PRO or DJUCED PRO+ license only.
12.4.3.Add MIDI device
Add a MIDI device in addition to your controller, for more buttons and encoders…
DJUCED now lets you add a MIDI device (the device must support standard MIDI protocol) and map it to control more functions.
Detected MIDI devices are visible on the top part of the mapping settings. Don’t forget to click on “activate” to use a device. MIDI devices must support MIDI discovery SysEx to be detected. (see https://midi.org/sysexidtable)
With DJUCED PRO or DJUCED PRO+ license only.
12.5.Keyboard
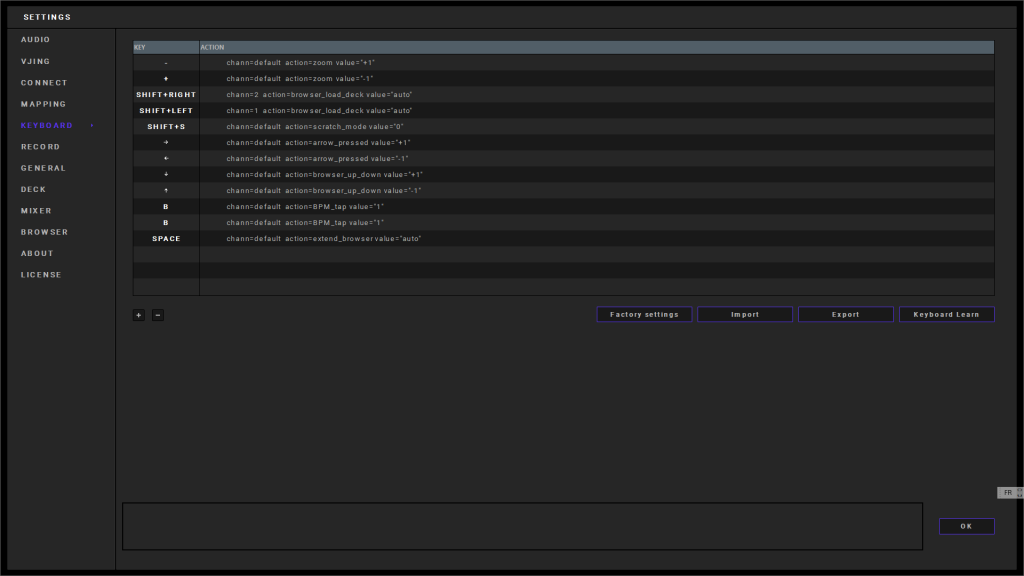
The Keyboard settings allow you to define keyboard shortcuts to control your software using your computer keyboard.
Thanks to keyboard learning, you can easily add a new key mapping. Begin by adding a line, then select Keyboard Learn.
Press the relevant key.
In the DJUCED interface, select the action you wish this key to take when pressed.
12.6.Record
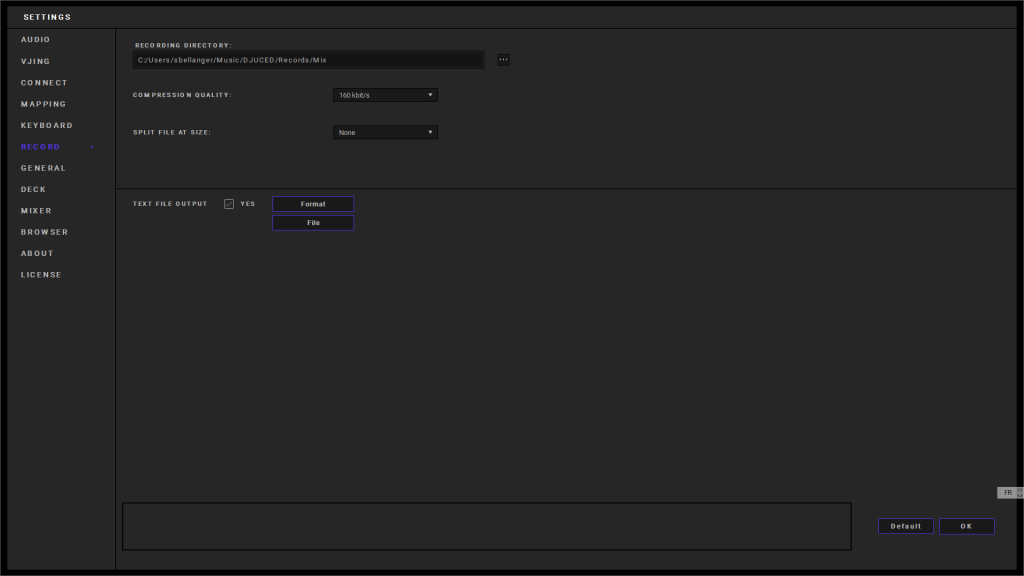
The Record menu allows you to define the following options:
12.6.1.Recording directory
This setting allows you to specify the path and the name of a file that you record in DJUCED.
The default path is C:/Users/userame/Documents/DJUCED 40/Records/Mix; you can modify it if you wish.
By default, DJUCED saves the file in an uncompressed format, in stereo, at the sampling rate and frequency defined in the audio settings.
12.6.2.Compression Quality
You are able to modify the compression quality when you save a compressed mix.
DJUCED uses Ogg Vorbis compression.
12.6.3.Split file at size
This setting allows you to set the maximum file size that it can reach before being divided. Limiting the saved file size allows for quicker control and respects the operating systems’ limitations.
12.6.4.Text File
DJUCED can write into a text file information about the playing tracks. This is very helpful when you want to add information over a video stream.
Format: the information to save.
%TI% Track title
%DE% Track deck
%AR% Track artist
%AL% Track album
%CT% Track time
%FL% Track location
File: Select the file location.
12.7.General
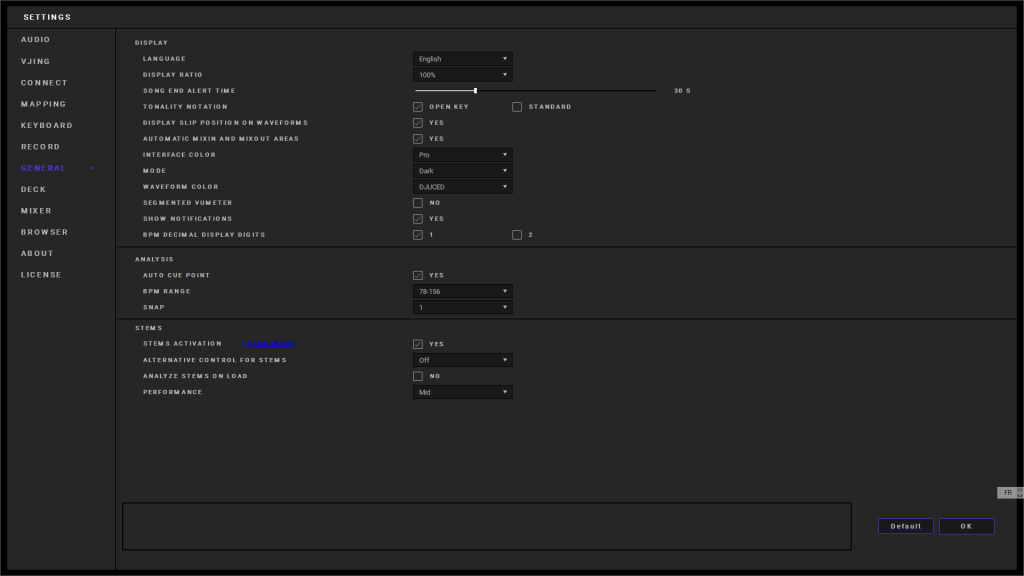
The General menu allows you to define the following settings:
12.7.1.Language
Choose the display language in DJUCED. Changing the language requires restarting DJUCED.
12.7.2.Display Ratio
Adjust the display resolution ratio.
DJUCED must be restated after a ratio change. At DJUCED startup you have to confirm that the ratio is correctly displayed. If you don’t confirm DJUCED will put back 100% ratio.
12.7.3.Song end alert time
The Song end alert feature allows you to define the number of remaining seconds in the song before the alert is displayed. The default time is 30 seconds.
This feature allows the DJ to be notified that the end of the track is approaching, and to therefore avoid a “blank” space during track transitions in the mix.
12.7.4.Tonality notation
Standard notation is usually C D E F G A B C, plus MAJ for major and MIN for minor.
Open Key Notation is another tonality scale used to improve mixes’ harmonic quality. Pieces’ tonalities are associated with a number (from 1 to 12) and a letter (m for minor or d for major).
Songs containing the same number +/- 1 can be mixed harmonically while staying in the same mode (d or m). As long as the number is the same, you can toggle between d and m.
For example, a piece with a 7d tonality corresponds harmonically to pieces with 6d, 7d or 7m and 8d tonalities.
12.7.5.Display SLIP position on waveforms
When “ON” the lower part of the waveforms displays the SLIP position. It allows exiting the SLIP at the perfect moment.
12.7.6.Automic MixIn and MixOut areas
The Smartmix uses the ‘MixIn’ and ‘MixOut’ area to mix the track together. Disable this option to force the Smartmix to mix tracks from their beginning to their end.
12.7.7.Interface Color
Chose your DJUCED’s colors.
Work with DJUCED PRO or DJUCED PRO+ license only.
12.7.8.Mode
Switch between Dark (night mode) and Light (day mode).
You can directly select day/night mode on the DJUCED interface.
Work with DJUCED PRO or DJUCED PRO+ license only.
12.7.9.Waveform color
This option allows you to choose different color themes for the waveform in the drop-down menu.
After selecting a theme, the waveform colors are updated.
12.7.10.Segmented vumeter
Display segmented the level vumeters.
Work with DJUCED PRO or DJUCED PRO+ license only.
12.7.11.Show Notifications
Allow DJUCED to display important notifications, information concerning new features.
12.7.12.BPM decimal display digits
Select the number of digits (in decimal part) to display in BPM values.
12.7.13.Auto Cue Point
The Auto Cue feature inserts a CUE 1 point on the track’s first beat if no CUE point has yet been defined.
This becomes useful if you have not prepared all your tracks before mixing.
12.7.14.BPM range
Set the range of BPM analysis result. If analysis result is out of the range, it will be multiplied or divided by two to fit in the range.
Select ‘OFF’ to disable automatic range adaptation.
12.7.15.SNAP
Set the SNAP size in beat.
Set to OFF to disable SNAP.
SNAP allows you to automatically align the creation of CUE points and Loop-ins and Loop-outs with the tracks’ beats.
DJUCED allows you to choose a SNAP value of 1/32 of a beat to 1 beat.
Thanks to SNAP, loops begin and end perfectly in rhythm and the CUE points position themselves perfectly in time. With a value of 1 beat, the loops and CUE points will always be aligned to the beats.
Smaller SNAP values allow for more freedom, but require more dexterity.
12.7.16.STEM Activation
Activate or deactivate stems.
It is recommended to activate STEM only on high-performance computers.
12.7.17.Alternative control for STEMS
If your controller does not have STEM control, allow stems to be controlled by slicer, loop roll, or sampler MIDI commands.
12.7.18.Analyze STEMS on load
Start analyzing the STEMS when a track is loaded.
It is recommended to activate stems analysis only on high-performance computers
12.7.19.Performance
Set how many resources to allocate for processing STEM
12.8.Deck
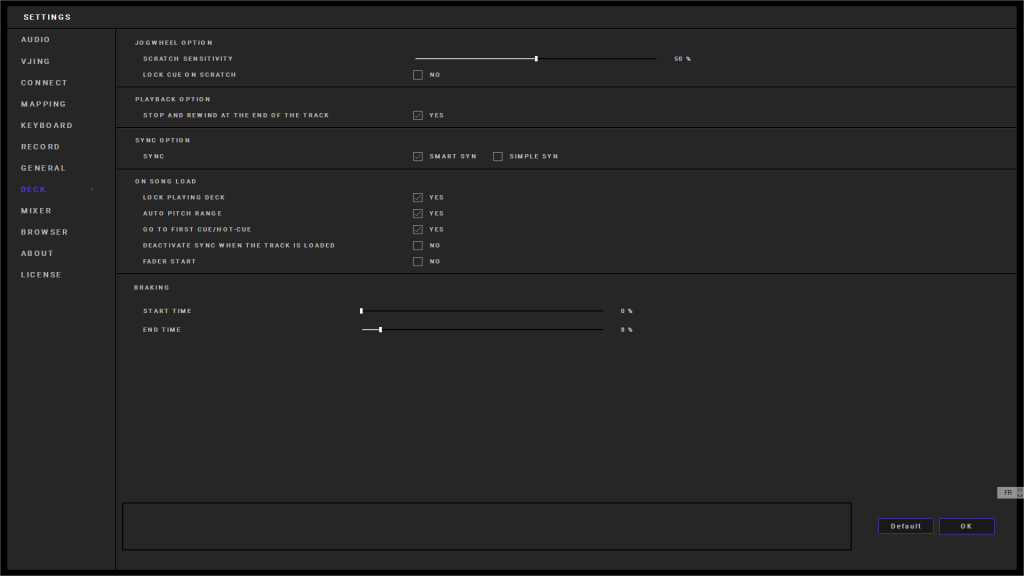
Edit the decks settings
12.8.1.Scratch Sensitivity
This setting specifies the sensitivity of the jog wheels during scratching. It applies in scratch mode when the jog wheel is turned while being pressed.
This parameter is not used for motorized wheels.
12.8.2.Lock CUE on scratch
When scratching from the CUE Start, the play head is automatically moved back to the CUE Start position when scratch ends.
12.8.3.Stop and rewind
Stop and rewind when the song is over.
When this setting is set to NO, the playback continues silently after the end of the song.
12.8.4.Sync option
Smart sync: Match BPM and snap beat grids together, even when you scratch.
Simple sync: Match BPM.
Works with DJUCED PRO and DJUCED PRO+ only.
12.8.5.Lock playing deck
By default, a deck is locked when playing. You cannot load a track on an already playing deck.
Disable this setting to be able to load a track on a plying deck. This will stop the currently plying track and load the new one.
12.8.6.Auto pitch range
When a track is loaded in a deck, DJUCED automatically changes the pitch fader range to get the best range for the given BPM difference.
12.8.7.On load go to first cue/hot-cue
When a track is loaded, the play-head position is set to the first cue/hot-point position.
12.8.8.Deactivate sync when a deck is loaded
By default the SYNC is permanent and when a new track is loaded the SYNC remains and the track BPM is synchronized to the MASTER track one.
12.8.9.Braking
Set the amount of brake effect when starting playback and stopping playback.
The brake effect emulates turntable inertie to start and stop spinning.
12.9.Mixer
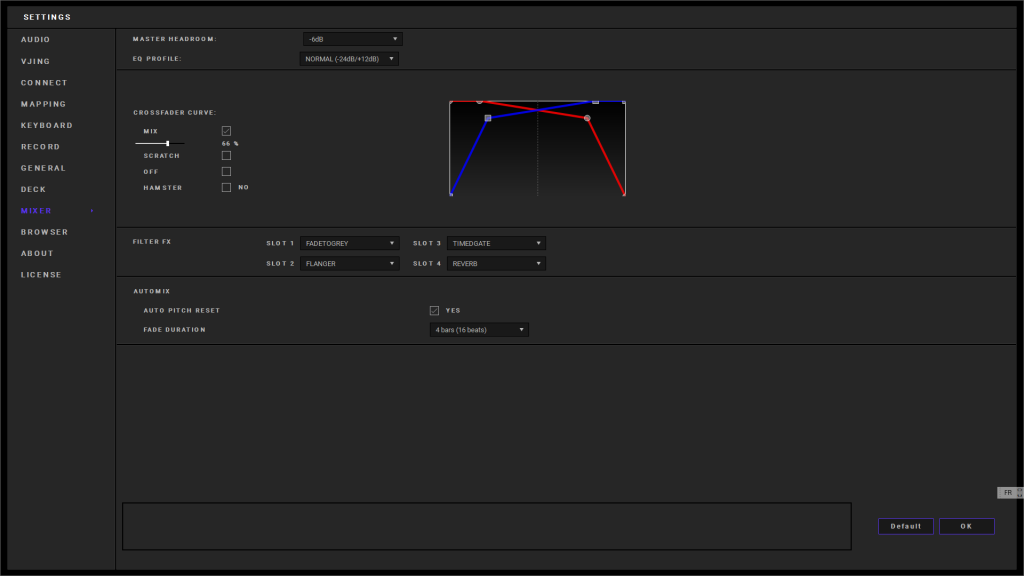
Here, you can adjust the crossfader curve, the equalization settings and the filter/FX..
DJUCED incorporates “Post-Crossfader” effects, which remain audible even when the volume control or crossfader of a deck is reduced.
12.9.1.Master Headroom
The digital headroom of DJUCED’s internal mixer must be carefully adapted to your personal mixing setup to avoid clipping.
We recommend choosing the following values for each typical setup:
- -3dB: Simple two Deck (A-B) setup.
-6dB: Two Deck (A-B) setup with frequent use of effects and/or EQ and filters.
-9dB: More than two decks with frequent use of effects and/or EQ and filter.
-12dB: Four Deck setup, including samplers with the frequent use of effects and/or EQ and filters.
12.9.2.EQ Profile
Select the EQ profile.
- By default DJUCED EQ range is from -24db to +12bd.
- Isolator cuts the whole band with a range from -96db to +12bd.
12.9.3.Software takeover
Software takeover is now located in the settings, allowing it to be activated for any controller.
When the physical position of a button does not match its position on the screen, software takeover displays a ghost image of the button until the physical position catches up with the position on the screen. This happens when a button controls two functions or when a physical button and an on-screen button are used at the same time.
12.9.4.Crossfader Curve
The crossfader curve is the shape of the mix’s curve, based on the position of the crossfader.
There are two crossfader curves:
- Mix (smooth transition between left and right). With the slider you can adjust the slope of this curve.
- Scratch (fast transition between left and right)
In addition:
- Hamster inverts the curve.
- OFF disables the crossfader.
12.9.5.Filter FX
Select the four Filters/FX to be used on the Filter knob.
Check the FilterFX reference for more information.
12.9.6.Auto Pitch Reset
When you use Magic Fade or automatic mixing, the pitch of the deck towards which the transition is applied is automatically restarted at the end of the transition. This option allows you to disable this help.
12.9.7.Fade duration
Set the duration of crossfade for Automix and Smartmix.
12.10.Browser
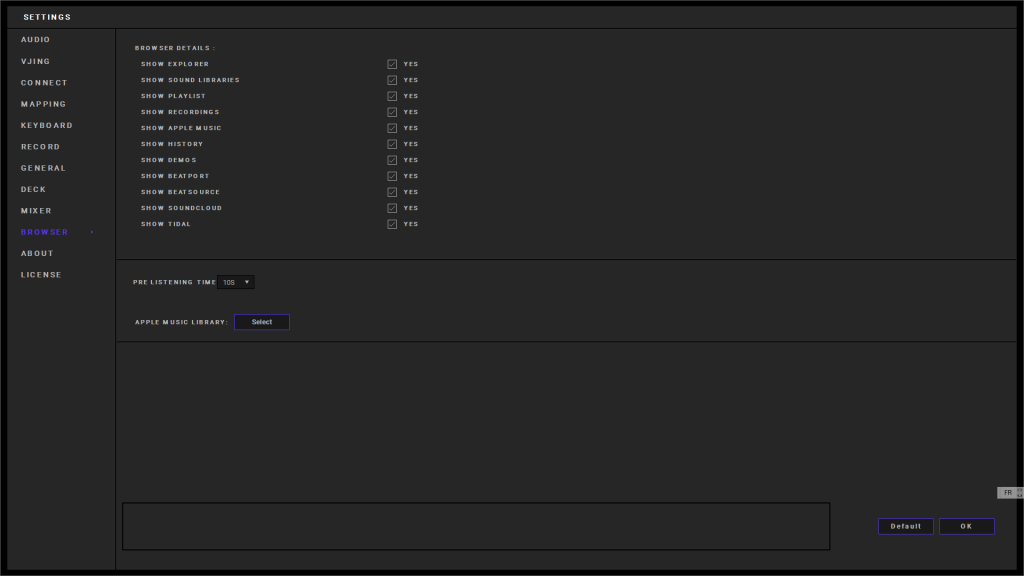
The Browser setting allows you to carry out the following actions:
12.10.1.Browser details
You can select the content you wish to display in the browser window.
12.10.2.Pre-listening time
Select the pre-listening time in seconds.
To pre-listen a track in the browser, right-click on the track and select “pre-listening”.
12.10.3.iTune
Access your iTunes library in DJUCED (PC Only). Tells DJUCED where to find your library XML file. It then becomes visible in the DJUCED explorer.
12.10.4.Rekordbox
Access your Rekordbox library in DJUCED. Tells DJUCED where to find your library XML file. It then becomes visible in the DJUCED explorer.
12.11.About
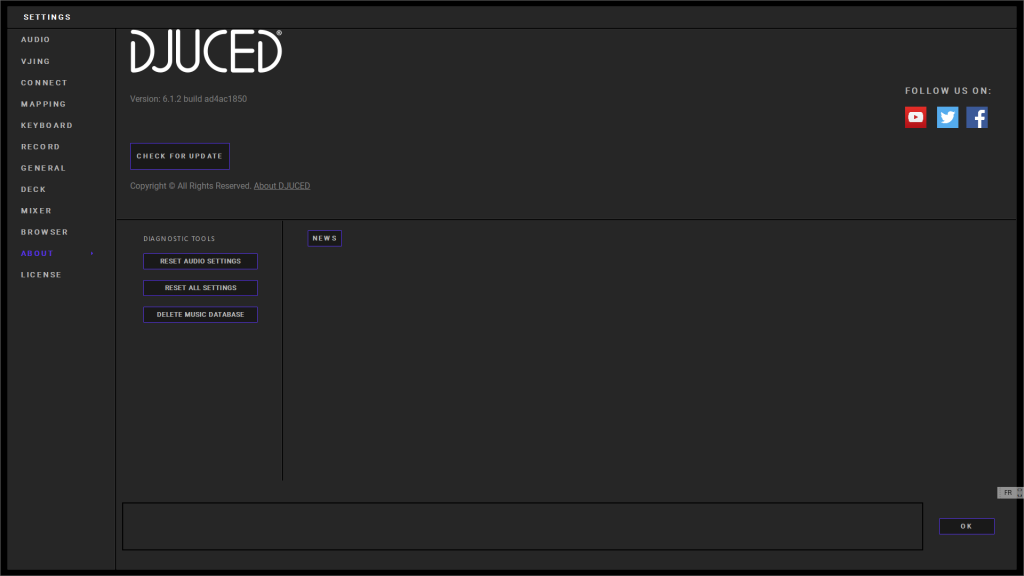
The About menu displays DJUCED’s version number and a link to update the software as well as important information and social networks.
12.11.1.Diagnostic Tools
Reset DJUCED’s settings to fix wrong configuration.
- Reset audio settings: Restore default audio settings for any DJUCED certified controllers and sound cards.
- Reset all settings: Restore all the settings and restart DJUCED.
- Delete music database: Delete the database. It will remove files from the song library, playlists, favourites and restart DJUCED. it will NOT delete the music files from the hard drive.
12.11.2.News
Display the latest news.
12.11.3.About DJUCED
More information about DJUCED Team.
13.Trademarks
Intel® and Pentium® are registered trademarks of Intel Corporation.
Microsoft® Windows® XP, Vista, 7, 8, 10 and 11 are registered trademarks or trademarks of Microsoft Corporation in the United States and/or in other countries.
Mac and macOS are trademarks of Apple Inc., registered in the U.S. and other countries.
The DJUCED brand and DJUCED’s graphic elements are the property of Guillemot Corporation.
All other trademarks and trade names are hereby acknowledged in this document and are the property of their respective owners. Illustrations not binding. Contents, designs and specifications in this document are subject to change without notice and may vary from one country to another.
DJUCED uses the following SDK from zplane.development: “elastique efficient” time stretching engine; “TONART” automatic key detection engine; “BARBEATQ” automatic song segmentation engine; “[aufTAKT]” tempo and beat tracking engine; “z.reverb” parametric reverberation engine; “Metering” peak & loudness metering engine; “fx::pack” audio effects bundle engine; “STEMS PRO” source separation and stem generation.
14.Copyright
No part of this manual may be reproduced, summarized, transmitted, transcribed, stored in a retrieval system, or translated into any language or computer language, in any form or by any means, electronic, mechanical, magnetic, manual, via photocopying, recording, or other, without the express written consent of Guillemot Corporation S.A.
15.DJUCED End User License Agreement
Please read the License Agreement displayed during installation of DJUCED® carefully.