

Setup #
Drivers and Firmware #
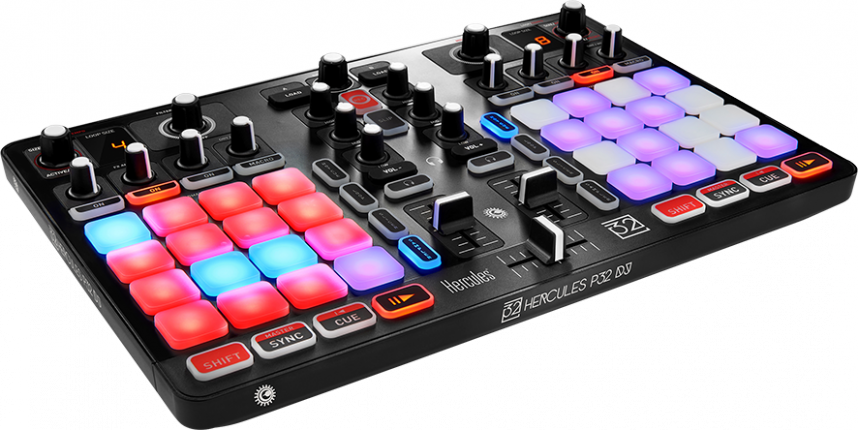
The Hercules P32DJ is a class-compliant USB controller.
It can work without driver installation on both macOS and Windows operating system, by plugging the USB connector into your computer.
Anyway, Windows needs the drivers in order to use the Hercules P32DJ in ASIO mode, which reduces the latency in relation to WASAPI mode, and is generally more stable.
The drivers also let you test your P32DJ and verify the firmware version in both Windows and macOS.
Please visit: https://support.hercules.com/en/product/p32dj-en/
Download the driver pack for your computer’s operating system.
– For macOS: HDJCSeries Mac
– For Windows: HDJCSeries PC
DJUCED audio Setup #
Please install the latest DJUCED version available for the best results: https://www.djuced.com/downloaddjuced
Audio Setup is automatic when you select the P32DJ sound card as an audio device.
By default, the P32DJ sound card is set up like this :
- Master = Outputs 1&2
- Headphones = Outputs 3&4
The easier way to reset to these settings is to use the « Reset Audio Settings » button with the Diagnostic Tools: https://www.djuced.com/kb/how-to-reset-audio-settings-to-default/
DJUCED midi Setup #
The Hercules P32DJ midi setup with DJUCED is automatic.
DJUCED will auto-detect the controller when the USB is connected to the computer and map the controller.
For the best MIDI performance, please don’t boot your computer with the controller plugged-in.
We recommend this behavior:
1- Start your computer
2- Connect your DJ controller USB to the computer and wait for initialisation
3- Start DJUCED
Controls #
(requires DJUCED 5.1.3 and superior)
Mixer Controls #
| CONTROL | ACTION | SHIFT + ACTION |
|---|---|---|
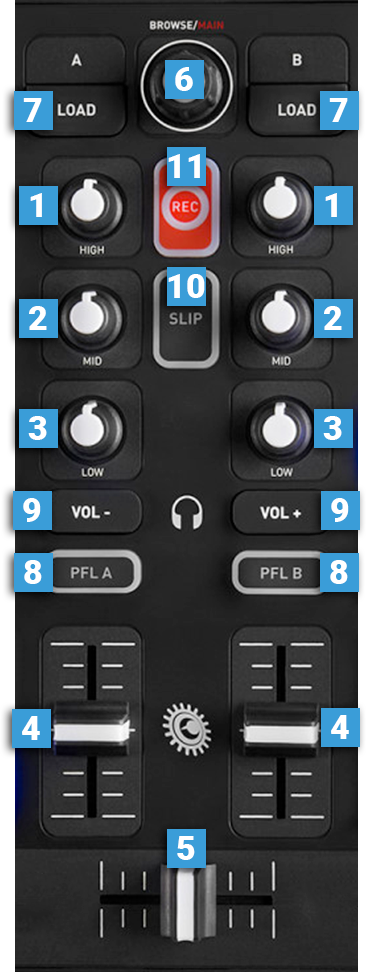
| 1 – Eq High | Use this knob to cut/boost the frequencies of the High (Treble) Equaliser Band. At the middle/center position, the EQ is OFF. | Eq High on Decks 3/4 |
| 2 – Eq Mid | Use this knob to cut/boost the frequencies of the Mid (Middle) Equaliser Band. At the middle/center position, the EQ is OFF. | Eq Mid on Decks 3/4 |
| 3 – Eq Low | Use this knob to cut/boost the frequencies of the Low (Bass) Equaliser Band. At the middle/center position, the EQ is OFF. Tip: remove Bass instead of boosting them when making a transition. | Eq Low on Decks 3/4 |
| 4 – Volume | Adjust the volume of the Left/Right deck. | Volume on Decks 3/4 |
| 5 – Crossfader | When at the far left position, only the sound from the left deck will be heard from the Master Output. When at the far right position, only the sound of the right deck will be heard from the Master Output. In all other positions, the audio signals from left/right decks will be a blend. | |
| 6 – Browser | Navigate through your audio library when turning the encoder, or change levels/open folders by pressing the encoder. | Shift + Turn: Controls the amount of volume sent to the Master. (to the connected speakers on the back of the controller). Shift + Push: Opens/Close the Intelligent Music Assistant panel on DJUCED Browser. |
| 7 – Load | Load the selected song in the Browser list or Assistant into the Left/Right Deck. | |
| 8 – Monitoring Buttons | The buttons with a headphones symbol on them send the pre-fader audio signal of the Left/Right deck to the Headphones channel (also called the CUE audio channel) for pre-listening (connection at the front side). | |
| 9 – Headphones Volume | Controls the amount of volume sent to the Headphones. (to the connected headphones on the front of the controller). Note: The Headphones Volume is Hardware driven and is not reflecting the software Headphones volume. This is why you can’t change DJUCED headphones’ volume on the user interface. The loop screen will display the volume level in percentage when you press a button. | SHIFT + VOL – = Preview Headphones channel (output 3-4) Right Screen displays ‘3.4’ SHIFT+ VOL+ = Preview Master channel in headphones (output 1-2) Right Screen displays ‘1.2’ |
| 10 – Slip | Turn-ON/OFF the Slip mode. Slip enables scratching, looping and hot cueing without breaking the rhythm of the track. When SLIP is engaged, the global waveform splits horizontally. The upper part of the waveform represents the play-head position, the lower part of the waveform represents the SLIP position (where the playback will resume once the SLIP is done). | Turn-ON/OFF Quantize mode. Quantize enables CUE, LOOP, and HOT CUE to be automatically triggered on tempo. |
| 11 – Record | Push to start/stop recording your DJ Set. When the record saving panel shows up, you can cancel the save by hitting the Rec button again. Note: recording is disabled if you use a 3rd party streaming service. |
Decks Controls #
| CONTROL | ACTION | ShIFT + AcTION |
|---|---|---|
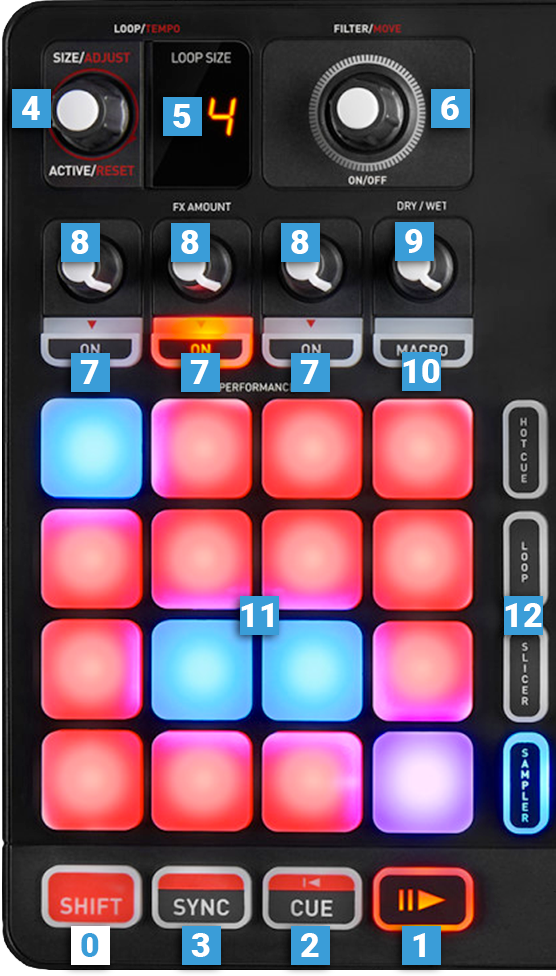
| 0 – SHIFT | SHIFT is a temporary button that allows a secondary function on another control. | |
| 1 – Play | Play/Pause the current Loaded track. When paused, the Play Button Blinks at the BPM of the song playing in the other deck to help you start in rhythm. | |
| 2 – Cue | 1: Set a CUE point (Orange triangle on DJUCED Waveform) as a temporary CUE Point. 2: When on a CUE Point, play and preview the track while the button is pressed. Go back to the CUE when released. 3: If the track was already playing, press CUE to stop playback on go back on the CUE point. | Returns to the beginning of the track. |
| 3 – Sync | Turn-ON/OFF Sync mode. Synchronizes the current deck to the tempo master. In this case, the Tempo cannot be changed. | Defines the Deck as tempo master for syncing. |
| 4 – Autoloop | Push to make a Loop ON/OFF. Turn to half/double the size of the Loop. | Shift + Turn to adjust the deck Tempo by 0.1 steps Shift + Push to reset Tempo to the original speed |
| 5 – Loop Size Display | Show the current selected Loop Size. Tip: For values smaller than 1 beat, a ‘dot’ is displayed after the value. Exemples: .2 = 1/2 Beat .4 = 1/4 Beat … | |
| 6 – Filter | Use this knob to apply a low-pass filter (left) or high-pass filter (right). Push to go back to the OFF position. | When Loop is active, Turn to move the Loop backward/forward. When Loop is not active, turn to make a Beat Jump backward/forward. |
| 7 – FX ON/OFF | Set the effect 1/2/3 of the effect rack ON/OFF | Select the next effect in the effect list |
| 8 – FX Amount | Allows to change the type/beat division/amount of the selected FX | Controls Sampler volume slot. |
| 9 – Dry/Wet | Controls the quantity of effect signal injected into the dry signal. Fat to the left, dry signal is heard Far to the right, FX signal is heard | |
| 10 – MacroFX | MacroFX allows controlling of all FX with one button, temporarily. Use Dry/Wet Knob to controls the amount of Macro FX. | |
| 11 – Pads | 16 Multicolored performance pads give you up to 4 different modes. Checks the details below. Pads have 3 colors: Red – Blue – Purple They can also be Dimmed or Bright. | |
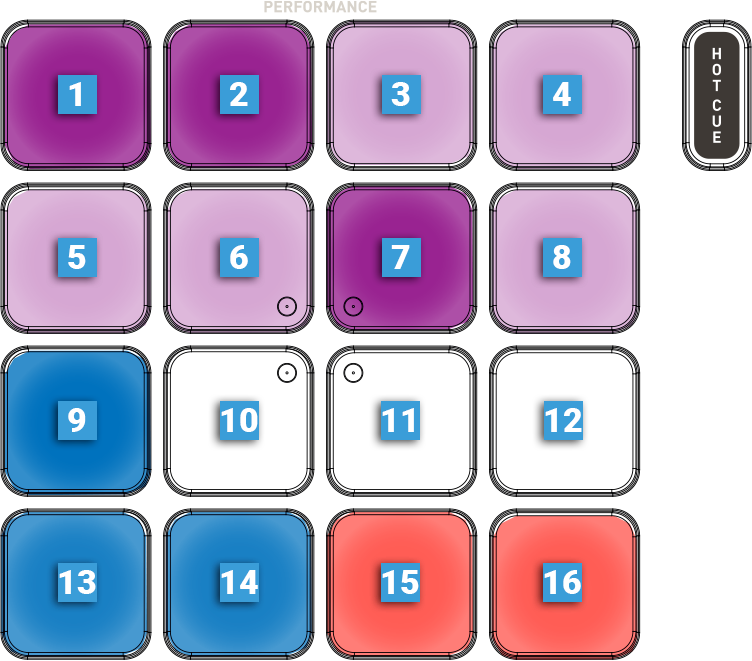
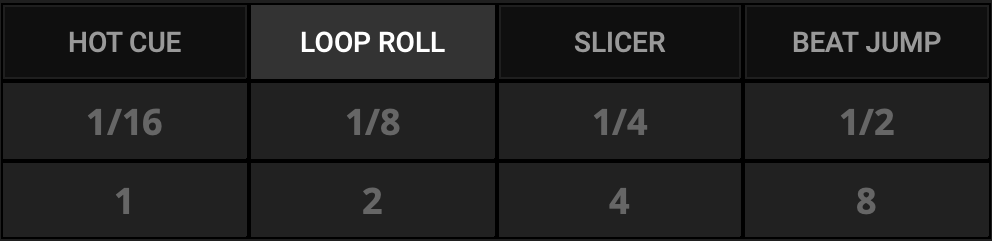
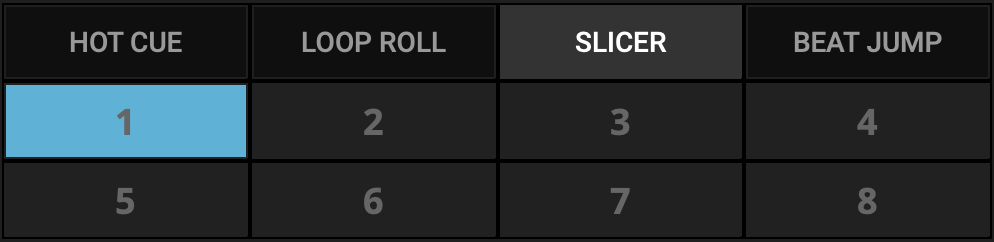
| 12 – Pads Modes | MODE 1 – HOT CUE Set Pads to Hot Cue mode and displays the Hot Cues on the DJUCED interface. MODE 2 – LOOP Set Pads to Loop mode and displays the Loop Roll on the DJUCED interface. MODE 3 – SLICER Set Pads to Slicer mode and displays the Slicer on the DJUCED interface. MODE 4 – SAMPLER Set Pads to Sampler mode | Browses through the entire song. |
Pads Modes #
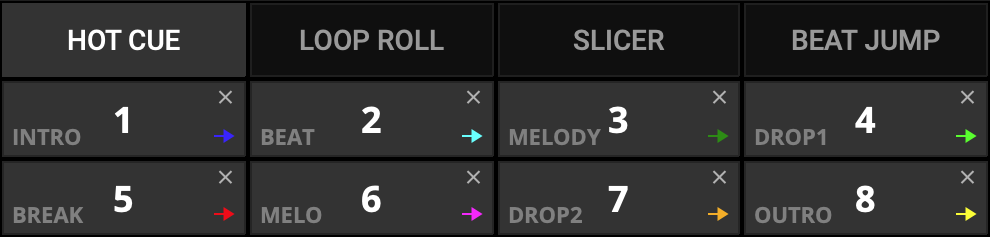
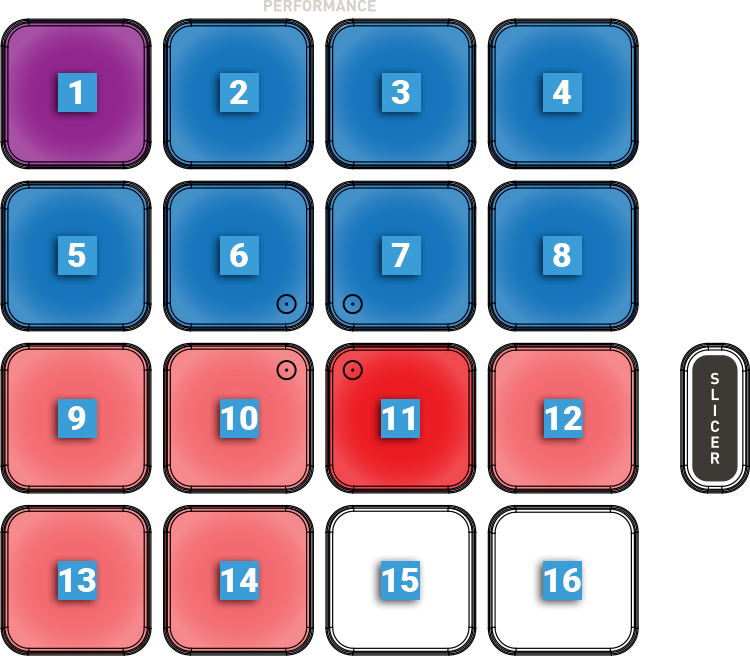
MODE 1 – HOT CUES #
Press the MODE 1 button to set the Pads in Hot Cue mode.
DJUCED interface will display the Hot Cue pads.
In this mode, you can also access tools to Beatmatch (with the Beat Align Guides) and correct phrasing with Beatjump.
Read the details below.
| CONTROL | ACTION | SHIFT + ACTION |
|---|---|---|
| PADS 1 – 8 HOT CUE | No Hot Cue has been set: Pressing a PAD assigns a Hot Cue to the current track position. A Hot Cue is already set: Pressing a PAD jumps the track position to the Hot Cue. Note: If a Loop was active when storing a Hot Cue, DJUCED creates automatically a Hot Cue Loop | Delete the assigned Hot cue on the selected Pad. |
| PADS 9 – 12 BEAT LEDS | Reflects the Beat Leds of the deck and shows you the rhythm when a track is playing. Pushing the pads does nothing. | |
| PADS 13 – 14 BEATJUMP | Pressing a PAD makes a one Beat Beatjump, backward/forward. | |
| PADS 15 – 16 BEATMATCH | Beatmatch PADS. Allows you to slow down/accelerate temporarily a track, like a jog wheel. Tip: The Red LEDs reflect the Beat Align guide system. When a pad is Bright, press it to beatmatch in the indicated pad direction. Beatmatch is done when the two pad’s LEDs are red low. |
MODE 2 – LOOP #
Press the MODE 2 button to set the Pads in Loop mode.
DJUCED interface will display the Loop Roll pads.
| CONTROL | ACTION |
|---|---|
| PADS 1 – 8 LOOP ROLL | Press and hold one of the 8 PADS performs a temporary Auto Loop from 1/16 of a Beat (PAD 1) to 8 Beats (PAD 8) It allows making from 1/16 to 8 beats loops and “stutter” effects without losing the phrase of the track. When the PAD is released, the playback position returns to the position it would have been if nothing had been done. |
| PADS 9 – 16 LOOP | Press to create an Auto-Loop from 1/16 of a Beat (PAD 9) to 8 Beats (PAD 16) |
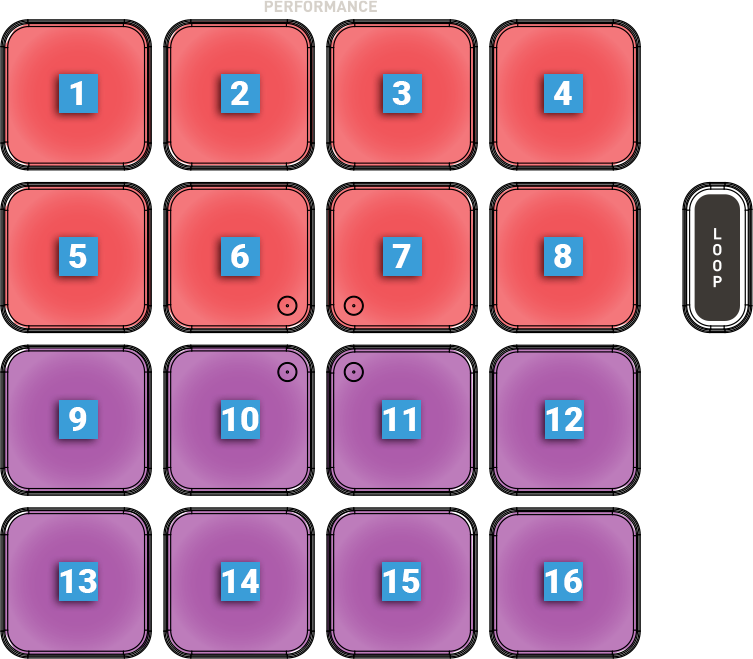
MODE 3 – SLICER #
Press the MODE 3 button to set the Pads in Slicer mode.
DJUCED interface will display the SLICER pads.
| CONTROL | ACTION |
|---|---|
| PADS 1 – 8 | The Slicer Mode divides an active loop into 8 Slices and will slide all along the track. Press and hold one of the 8 PADS performs a slice that can be triggered in real-time, and allow you to jump between different sections of an active loop. Once a slice is triggered, looping will begin within the selected Slice for as long as the pad is depressed. |
| PADS 9 – 14 | Press a pad to change the Slicer length from 1 Beat (PAD 9) to 32 Beats (PAD 14) |
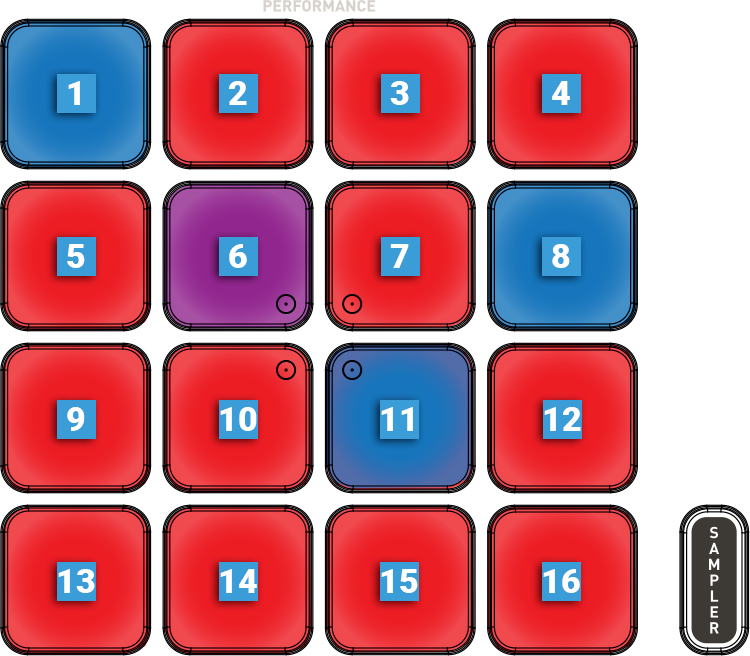
MODE 4 – SAMPLER #
Press the MODE 4 button to set the Pads in Sampler mode.
DJUCED multilayer sampler extends the creativity.
Use one shot samples or perfect synchronized loops to overlay and personalize your mix.
DJUCED proposes 4 samplers per deck, with a maximum of 4 layers each.
Multilayer Sampler is a powerful feature, please follow this guide to master them: https://www.djuced.com/guide-to-use-djuced-multilayer-samplers/
| CONTROL | ACTION | SHIFT + ACTION |
|---|---|---|
| PADS 1 – 16 | When a sample is assigned to a Pad, press the pad to trigger this sample. There are 3 different playback modes: One-shot: Play when pressed, restart when pressed again Hold: Play when pressed, stop when released Toggle: Play when pressed, stop when pressed again In all the modes, the samples can be looping or not. Tip: PAD is RED: Sample is stopped PAD is BLUE: Sample is playing PAD is PURPLE: Sample is waiting to play in the next Quantize beat | Stops the playback if the sample is set to a loop. |
Secret Features #
Beat Grid management #
(requires DJUCED 5.1.3 or superior)
It’s possible to manage Beatgrid in real-time, even when playing a track, by doing the following combinations:
| CONTROL | ACTION |
|---|---|
| SHIFT + PAD 9 in Hotcue Mode | Force DJUCED to re-analyze the track currently loaded in the deck |
| SHIFT + PAD 10 in Hotcue Mode | Set the Beginning of the Beat Grid on the Play Head position |
| SHIFT + PAD 11/12 in Hotcue Mode | Shift the position of the Beat Grid backward/forward |
| SLIP + JOGWHEEL | Increase/Decrease the Beat Grid BPM by 0.1 |
Other Tricks #
| CONTROL | ACTION |
|---|---|
| SAMPLER MODE BUTTON + PAD 1-16 | In Sampler Mode (Pad Mode 4), extracts an active Loop to a Pad |
| SHIFT + PRESS ENCODER BUTTON | Opens/Close the Intelligent Music Assistant panel on DJUCED Browser. |
Alternative Mappings #
DJUCED proposes alternative mappings for the P32DJ, built-in the application.
It will allow your to use the P32DJ as a 2 Decks standalone Unit (default mapping), or as an additional controller with a classic jogwheel controller.
Go into DJUCED Settings > Mapping tab to choose a mapping (1) and click OK (2) to apply it.
Note: after applying a new mapping, a DJUCED restart is recommended.
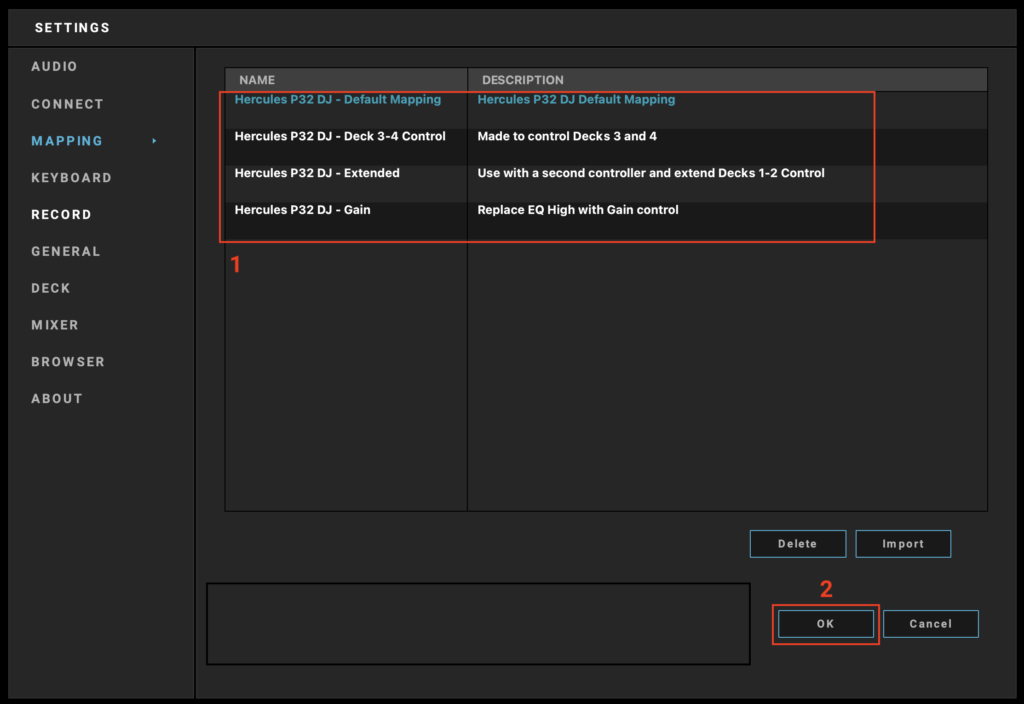
| MAPPING NAME | DESCRIPTION |
|---|---|
| Default Mapping | This is the Default 2 Decks P32DJ mapping |
| Deck 3-4 Control | Allows you to control Decks 3 and 4 instead of Decks 1 and 2 – Perfect for 4 Decks mixing with another controller (P32DJ Crossfader is disabled in that mode) |
| Extended | Allows you to extend the possibilities of another DJ controller by adding the P32DJ Loop, FX, and other modes. (P32DJ Crossfader is disabled in that mode) Very useful if your other controller doesn’t have a complete dedicated FX area, limited pads, or Loop controls. |
| Gain | Identical to the Default 2 Decks P32DJ mapping, but “Eq High” is replaced by “Gain” control. |