

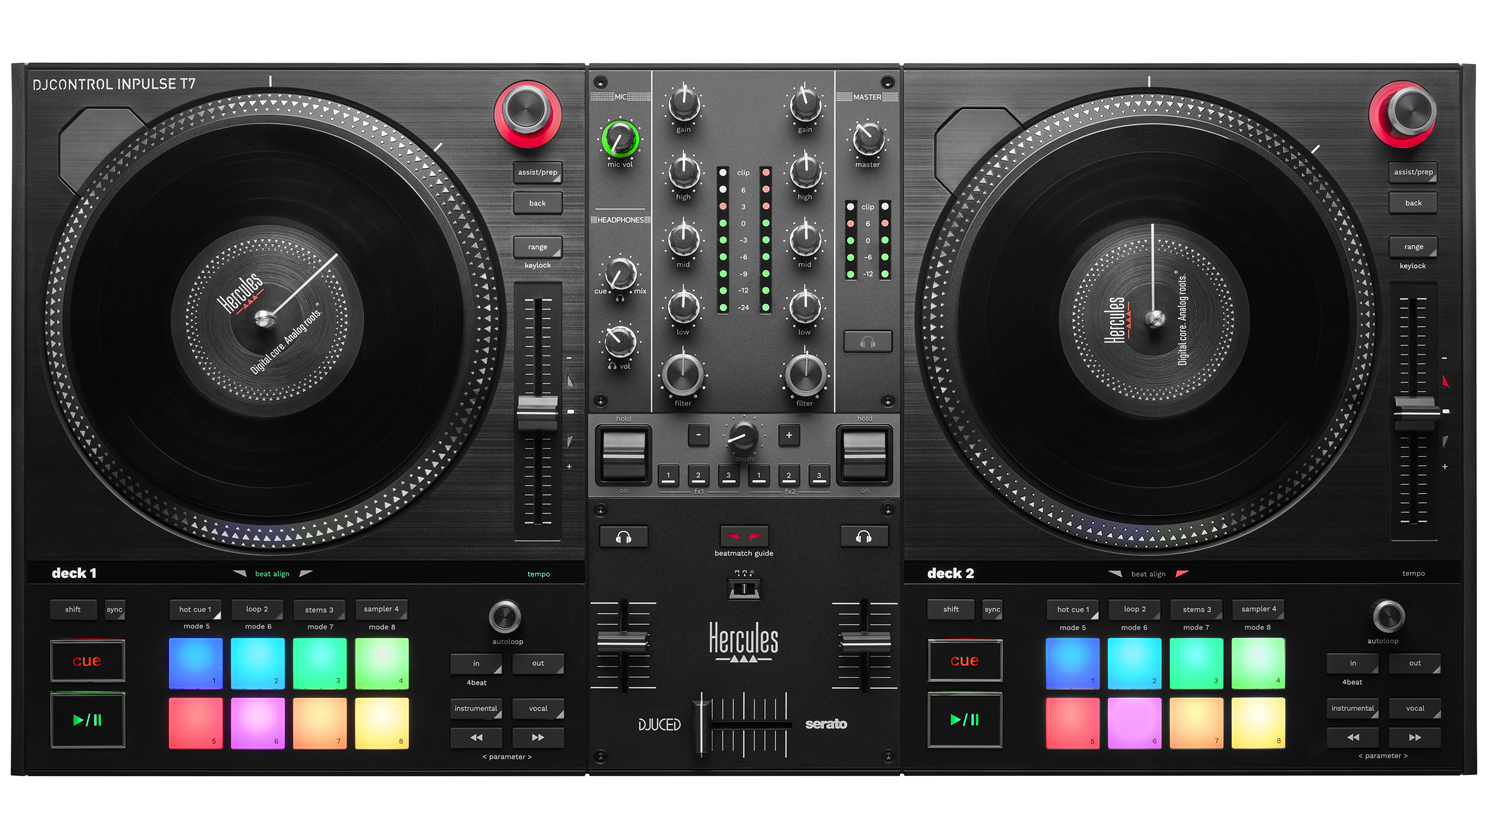
The Hercules DJControl Inpulse T7 is the perfect motorized DJ controller to help you take your first steps towards mastering the art of vinyl turntables! This modern take on a classic tool combines the genuine feeling of real vinyl discs with the benefits of digital technology. With 2 motorized platters for 7” discs that go from 0 to 33⅓ RPM in just a tenth of a second, you can practice DJing on vinyl and experience the authentic feeling of real turntables. The separate vinyl record, slipmat, and platter even allow you to remove the vinyl record, giving you full control of your performance.
System requirements #
Before software installation, please ensure your computer meets or exceeds the recommended or high performance specifications, depending on your desired usage, which are outlined via the DJUCED system requirements on the download page or Knowledge Base.
Both macOS and Windows users (no matter the specifications of their computer) are strongly recommended to complete all of the Optimization steps outlined in the Optimization guide or other optimisations articles.
Setup #
Drivers and Firmware #
The Hercules DJControl Inpulse T7 is a class-compliant USB controller.
It can work without driver installation on both macOS and Windows operating system, by plugging the USB connector into your computer.
Anyway, Windows needs the drivers in order to use DJControl Inpulse T7 in ASIO mode, which reduces the latency in relation to WASAPI mode, and is generally more stable.
The drivers also let you test your DJControl Inpulse T7 and verify the firmware version in both Windows and macOS.
Please visit: https://support.hercules.com/product/djcontrolinpulset7/
Download the driver pack for your computer’s operating system.
– For macOS: HDJCSeries Mac
– For Windows: HDJCSeries PC
DJUCED audio Setup #
The Hercules DJControl Inpulse T7 requires DJUCED version 6.0.1 or superior to work.
Please install the latest DJUCED version available for the best results: https://www.djuced.com/downloaddjuced
Audio Setup is automatic when you select the Inpulse T7 sound card as an audio device.
By default, the Inpulse T7 sound card is set up like this :
- Master = Outputs 1&2
- Headphones = Outputs 3&4
- Deck 1 = Inputs 1&2 (You can choose with this setting on with Deck you can send the Mic or Aux signal of the Inpulse T7)
The easier way to reset to these settings is to use the « Reset Audio Settings » button with the Diagnostic Tools: https://www.djuced.com/kb/how-to-reset-audio-settings-to-default/
DJUCED midi Setup #
The Hercules DJControl Inpulse T7 midi setup with DJUCED is automatic.
DJUCED will auto-detect the controller when the USB is connected to the computer and map the controller.
For the best MIDI performance, please don’t boot your computer with the controller plugged-in.
We recommend this behavior:
1- Start your computer
2- Connect your DJ controller USB to the computer or Power Up the T7 and wait for initialisation
3- Start DJUCED
Controls #
(requires DJUCED 6.0.3 and superior)
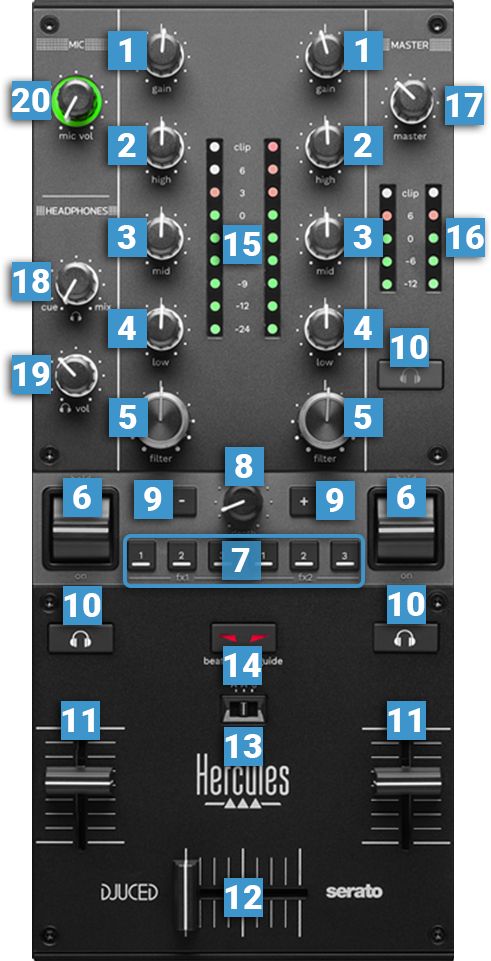
Mixer Controls #
| CONTROL | ACTION |
|---|---|
| 1 – Gain | Use this knob to adjust the pre-fader output level of the Left/Right deck. When the knob is at the middle/center position, the track will be at its original level. Tip: Adjust your gain level with the help of the Vu-Meter, the overall level should be around 0 dB. |
| 2 – Eq High | Use this knob to cut/boost the frequencies of the High (Treble) Equaliser Band. At the middle/center position, the EQ is OFF. |
| 3 – Eq Mid | Use this knob to cut/boost the frequencies of the Mid (Middle) Equaliser Band. At the middle/center position, the EQ is OFF. |
| 4 – Eq Low | Use this knob to cut/boost the frequencies of the Low (Bass) Equaliser Band. At the middle/center position, the EQ is OFF. Tip: remove Bass instead of boosting them when making a transition. |
| 5 – FILTER | Use this knob to apply a low-pass filter (left) or high-pass filter (right), enabled when FX1, 2, 3, and 4 are off. If FX1, 2, 3, or 4 is activated, the Filter Knob applies a Filter FX |
| 6 – FX Paddle | Use these paddles to activate the selected effect. Move the paddles away from you to activate the selected effect permanently. The paddles will latch to that position. Pull the paddles towards you to activate the selected effect momentarily. |
| 7 – FX Select | Applies the selected FX to the Left or Right Paddle. Only one effect can be activated at a time. fx1 – 1/2/3 buttons : controls FX1/2/3 of the first FX Rack of DJUCED and is activated by the Left Paddle. fx2 – 1/2/3 buttons : controls FX1/2/3 of the second FX Rack of DJUCED and is activated by the Right Paddle. |
| 8 – depth | Adjust the quantity or beat of a selected FX |
| 9 – Minus and Plus | These buttons are not assigned for now. |
| 10 – Monitoring Buttons | The buttons with a headphones symbol on them send the pre-fader audio signal of the Left/Right deck to the Headphones channel (also called the CUE audio channel) for pre-listening (connection at the front side). You can also use the Master headphones button to preview the Master signal that you are sending to the speakers. Tip: the Master Headphones button allows you to listen to any source that is sent to the 1-2 Channel Audio Output of the Inpulse sound card – if you use the Inpulse as a computer sound card. (like your Internet browser, Music software, video game…) |
| 11 – Volume | Adjust the volume of the Left/Right deck. |
| 12 – Crossfader | When at the far left position, only the sound from the left deck will be heard from the Master Output. When at the far right position, only the sound of the right deck will be heard from the Master Output. In all other positions, the audio signals from left/right decks will be a blend. |
| 13 – Crossfader Curve | Select a curve for your crossfader: -Smooth (for Mixing) -Sharp (for Scratching) -Disabled |
| 14 – Beatmatch Guide | Enable/Disable the Beatmatch Guide LEDs that you will find on the Decks. |
| 15 – Decks Vu-Meters | Indicate the pre-faders level of the Left/Right Decks. Tip: Always try to stay between the maximum green/orange area to avoid clipping in the red. |
| 16 – Master Vu-Meters | Indicate the audio output level sent to the Master. Note: These Vu-Meters are Hardware driven and are not reflecting the software Master Vu-meters. |
| 17 – Master Volume | Controls the amount of volume sent to the Master. (to the connected speakers on the back of the controller). Note: The Master Volume is Hardware driven and is not reflecting the software Master volume. This is why you can’t change DJUCED master volume on the user interface. |
| 18 – Headphones Mix | Blends the signal from the Deck (CUE Channel) and the Master Output in Headphones. |
| 19 – Headphones Volume | Controls the amount of volume sent to the Headphones. (to the connected headphones on the front of the controller). Note: The Headphones Volume is Hardware driven and is not reflecting the software Headphones volume. This is why you can’t change DJUCED headphone’s volume on the user interface. |
| 20 – Mic Volume | Adjusts the level of the Microphone Input (connection at the rear panel). Use the Vu-Meter ring to set up properly the level of the sound. When far to the left, the Microphone Input is totally muted. Note: the Microphone input is Hardware driven and can work without DJUCED. |
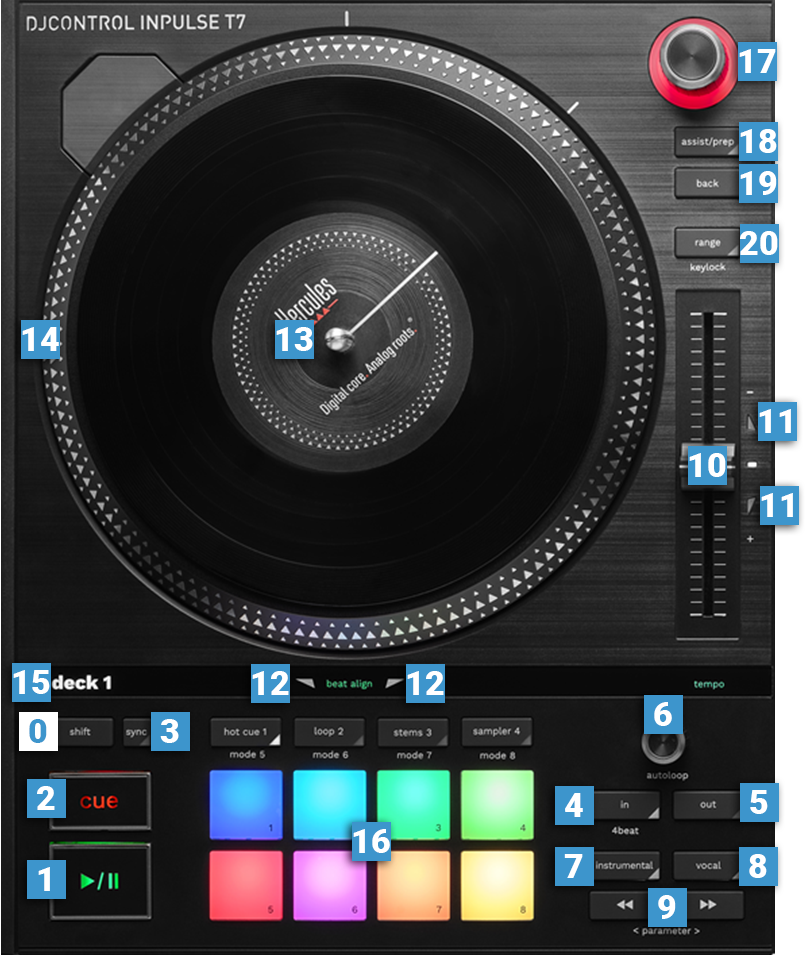
Decks Controls #
| CONTROL | ACTION | ShIFT + AcTION |
|---|---|---|
| 0 – SHIFT | Shift is a temporary button that allow a secondary function on another control. | |
| 1 – Play | Play/Pause the current Loaded track. When paused, the Play Button Blinks at the BPM of the song playing in the other deck to help you start in rhythm. | |
| 2 – Cue | 1: Set a CUE point (Orange triangle on DJUCED Waveform) as a temporary CUE Point. 2: When on a CUE Point, play and preview the track while the button is pressed. Go back to the CUE when released. 3: If the track was already playing, press CUE to stop playback on go back on the CUE point. | Returns to the beginning of the track. |
| 3 – Sync | Turn-ON/OFF Sync mode. Synchronizes the current deck to the tempo master. In this case, the Tempo cannot be changed. | Defines the Deck as tempo master for syncing. |
| 4 – Loop In | Press to set the current position as the beginning of a manual loop. Press and hold LOOP IN to make a 4 Beats auto-loop. Press a second time to manually edit the loop point with the Jogwheel. (LED is Blinking) | Divides the Loop length by 2. |
| 5 – Loop Out | Press to set the current position as the end of a manual loop and enter the Loop. Press a second time to manually edit the loop point with the Jogwheel. (LED is Blinking) | Multiply the Loop length by 2. |
| 6 – Autoloop | Push to make a Loop ON/OFF. Turn to half/double the size of the Loop. | When Loop is active, Turn to move the Loop backward/forward. When Loop is not active, turn to make a Beat Jump backward/forward. |
| 7 – STEMS Instrumental | Press to listen only the Instrumental part of the DJUCED STEMS. | Turn-ON/OFF the Slip mode. Slip enables scratching, looping and hot cueing without breaking the rhythm of the track. When SLIP is engaged, the global waveform splits horizontally. The upper part of the waveform represents the play-head position, the lower part of the waveform represents the SLIP position (where the playback will resume once the SLIP is done). |
| 8 – STEMS Vocal | Press to listen only the Vocal part of the DJUCED STEMS. | Turn-ON/OFF Quantize mode. Quantize enables CUE, LOOP, and HOT CUE to be automatically triggered on tempo. |
| 9 – Pitch Bend | Stay pressed on a pitch bend button to slow-down or speed-up temporarily the track you are playing. | |
| 10 – Tempo Fader | The Tempo fader (also called Pitch Fader) adjusts the tempo (speed) of the loaded track. When in the middle position (White LED is ON), the track plays at its original speed. | |
| 11 – Tempo Guides | Tempo guides are part of the Beatmatch Guide System. These Red arrows LEDs indicate if you need to decrease or increase the Tempo to match the other deck BPM. When the Tempo matches the other deck, the red arrows turn OFF – and the green ‘TEMPO’ led text lights up. | |
| 12 – Beat Align Guides | Beat Align guides are part of the Beatmatch Guide System. These Red arrows LEDs indicate if you need to slow-down or speed-up the track you are playing to match the other deck Beat Grid. Follow the arrows by moving the outer-ring of the Jogwheel (14). When the Beat match is correct, the red arrows turn OFF – and the green ‘BEAT ALIGN’ LEDs light up. | |
| 13 – Vinyl Disk | Touching and stopping the vinyl disk stops the playback, and resumes when released. Turning the wheel when touching the platter makes a scratch. | SHIFT + Disk : Seek into the song |
| 14 – Metal Platter | Use the Platter to slow-down or speed-up the track you are playing. | |
| 15 – On Air | This White LED indicates that the Deck is audible into the audio Master (so to the Speakers). | |
| 16 – Pads | The performance pads give you up to 8 different modes. Checks the details below. | |
| 17 – Browser | Navigate through your audio library when turning the encoder, or change levels/open folders by pressing the encoder. Press to load the selected track in the Deck. Doubleclick to load and clone the track from the other deck. (Instant Double) | Shift + Turn to Navigate faster in the Library Shift + Click to Extend the Library view |
| 18 – Assistant | Opens/Close the Intelligent Music Assistant panel on DJUCED Browser. | HIDDEN FEATURE : Shift + Assistant = Set the Beginning of the Beat Grid on the Play Head position. |
| 19 – Back | Sets focus to Folders list. | Sets focus to Category list. |
| 20 – Range | Cycle through the available range % for Pitch/Tempo fader. A bigger pitch range will give you a bigger range of possible BPM matches, but the pitch slider movement will be less accurate. Note: you can activate the AutoPitch Range in DJUCED Settings => Deck to let DJUCED choose the best range possible. | Toggle Keylock on/off. When enabled, the Key of the track will retain its value when Tempo is changed. |
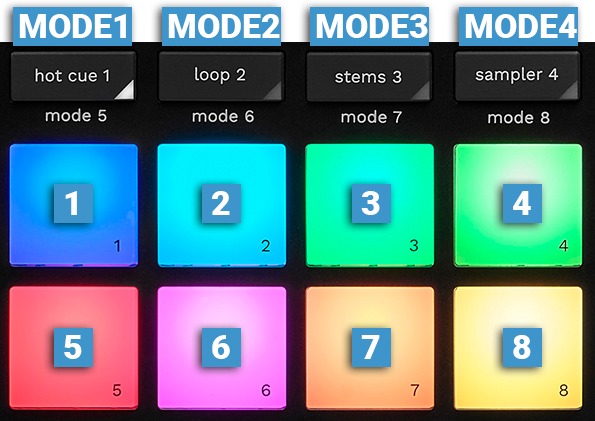
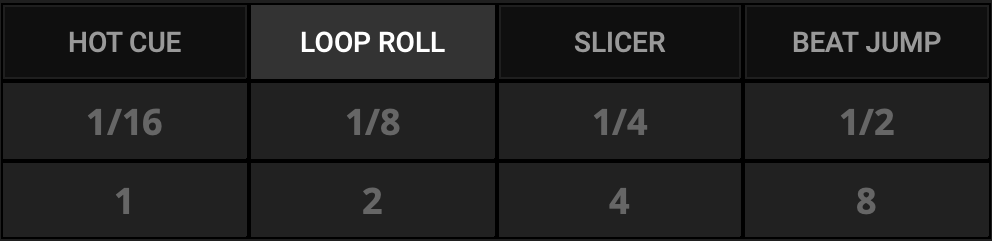
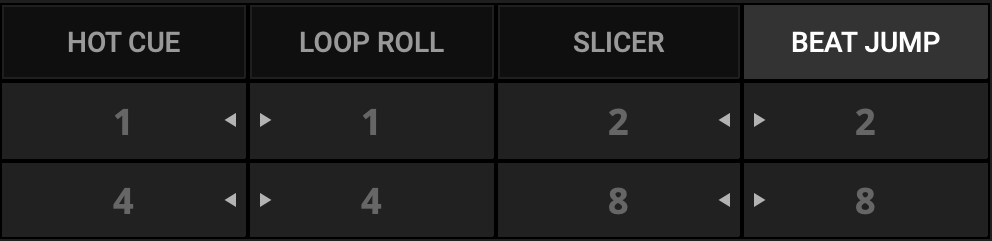
Pads Modes #
| CONTROL | ACTION | ShIFT + AcTION |
|---|---|---|
| MODE 1 – HOT CUE | Set Pads to Hot Cue mode and displays the Hot Cues on DJUCED interface. | Set Pads to MODE 5: Toneplay (white led is blinking) |
| MODE 2 – LOOP ROLL | Set Pads to Loop Roll mode and displays the Loop Roll on DJUCED interface. | Set Pads to MODE 6: PadFX (white led is blinking) |
| MODE 3 – STEMS | Set Pads to STEMS mode and displays the Stems on DJUCED interface. | Set Pads to MODE 7: SLICER LOOP (white led is blinking) |
| MODE 4 – SAMPLER | Set Pads to Sampler mode | Set Pads to MODE 8: BEAT JUMP (white led is blinking) and displays the BEAT JUMP on DJUCED interface. |
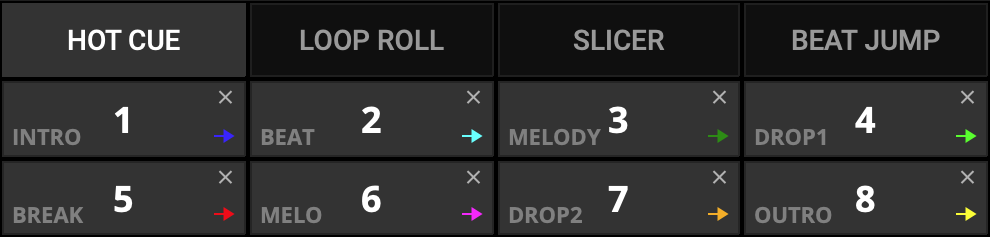
MODE 1 – HOT CUES #
Press the MODE 1 button to set the Pads in Hot Cue mode. The Hot Cue mode is the default pads mode.
DJUCED interface will display the Hot Cue pads.
You can rename and change the Pads colors with a right-click.
| CONTROL | ACTION | SHIFT + ACTION |
|---|---|---|
| PADS 1 – 8 | No Hot Cue has been set: Pressing a PAD assigns a Hot Cue to the current track position. A Hot Cue is already set: Pressing a PAD jumps the track position to the Hot Cue. Note: If a Loop was active when storing a Hot Cue, DJUCED creates automatically a Hot Cue Loop | Delete the assigned Hot cue on the selected Pad. |
MODE 2 – LOOP ROLL #
Press the MODE 2 button to set the Pads in Loop Roll mode.
DJUCED interface will display the Loop Roll pads.
| CONTROL | ACTION |
|---|---|
| PADS 1 – 8 | Press and Hold one of the 8 PADS performs an Auto Loop from 1/16 of a Beat (PAD 1) to 8 Beats (PAD 8), It allows to make from 1/16 to 8 beats loops and “stutter” effects without losing the phrase of the track. When the PAD is released, the playback position returns to the position it would have been if nothing had been done. |
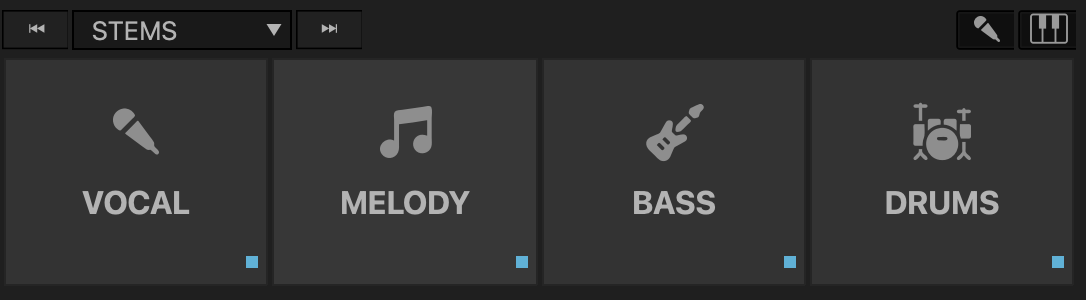
MODE 3 – STEMS #
Press the MODE 3 button to set the Pads in Slicer mode.
DJUCED interface will display the SLICER pads.
| CONTROL | ACTION |
|---|---|
| PADS 1 – 4 | Press one of the 4 PADS to remove one of the 4 STEMS : Vocal – Melody – Bass – Drums |
MODE 4 – SAMPLER #
Press the MODE 4 button to set the Pads in Sampler mode.
DJUCED multilayer sampler extends the creativity.
Use one shot samples or perfect synchronized loops to overlay and personalize your mix.
DJUCED proposes 4 samplers per deck, with maximum 4 layers each.
The Inpulse 500 allows you to control 8 samples in the Multilayer Sampler of DJUCED, and you can switch between pages.
Multilayer Sampler is a powerful feature, please follow this guide to master them: https://www.djuced.com/guide-to-use-djuced-multilayer-samplers/
| CONTROL | ACTION | SHIFT + ACTION |
|---|---|---|
| PADS 1 – 8 | When a sample is assigned to a Pad, press the pad to trigger this sample. There are 3 different playback modes: One-shot: Play when pressed, restart when pressed again Hold: Play when pressed, stop when released Toggle: Play when pressed, stop when pressed again In all the modes, the samples can be looping or not. | Stops the playback if the sample is set to a loop. |
MODE 5 – TONEPLAY #
Press the Shift + MODE 1 button to set Pads to MODE 5: Toneplay (white led is blinking)
Toneplay is a fun and creative mode that allows you to replay the latest HotCue selected in different tonality, like a Piano for Hot Cues !
| CONTROL | ACTION |
|---|---|
| PAD 1 | Plays the Hot cue at its original Tonality (Key) |
| PAD 2 to 4 | Plays the Hot cue at superior Tonality (Key) from +1 to +3 |
| PAD 8 to 5 | Plays the Hot Cue at inferior Tonality (Key) from -1 to -4 |
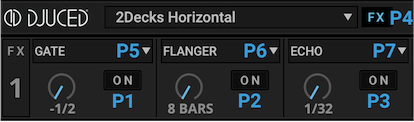
MODE 6 – PAD FX #
Press the Shift + MODE 2 button to set Pads to MODE 6: PadFX (white led is blinking)
PadFX mode allows you to control the classic effects from the DJUCED FX Racks.
| CONTROL | ACTION |
|---|---|
| PAD 1-2-3 | Effects 1-2-3 ON/OFF |
| PAD 4 | Show/Hide FX Panel |
| PAD 5-6-7 | Select next FX 1-2-3 |
MODE 7 – SLICER LOOP #
Press the Shift + MODE 3 button to set Pads to MODE 7: SLICER LOOP (white led is blinking)
Slicer Loop is identical as Slicer mode, instead that the Slicer stays in the Loop and don’t follow the track.
MODE 8 – BEAT JUMP #
Press the Shift + MODE 4 button to set Pads to MODE 8: Beat Jump (white led is blinking)
Beat Jump mode allows you to make a precise Jump of 1-2-4 or 8 beats into the track, backward or forward, while playing or not.
It’s a useful tool to re-catch a phrase, or to prepare your beat grids.
| CONTROL | ACTION |
|---|---|
| PAD 1-2 | Jump 1 Beat Backward/Forward |
| PAD 3-4 | Jump 2 Beats Backward/Forward |
| PAD 5-6 | Jump 4 Beats Backward/Forward |
| PAD 7-8 | Jump 8 Beats Backward/Forward |
Secret Features #
Beat Grid management #
(requires DJUCED 5.1.3 or superior)
It’s possible to manage Beatgrid in real-time, even when playing a track, by doing the following combinations:
| CONTROL | ACTION |
|---|---|
| SHIFT + ASSIST/PREP | Set the Beginning of the Beat Grid on the Play Head position |
Other Tricks #
| CONTROL | ACTION |
|---|---|
| SHIFT + HEADPHONE DECK BUTTON | Changes the current FilterFX to the next one |
| SHIFT + VOLUME FADER 1/2 | Controls decks 3/4 Volume faders |
Troubleshooting #
DJUCED is not fluid or seems laggy with the Inpulse T7, why ? #
The Hercules DJControl T7 is a motorised controller that requires more USB MIDI communication than a conventional controller.
When I use ASIO on windows, I can still ear so audio artefacts even if I put more ASIO Buffer, why ? #
On a well optimized computer, it should not happen. Please follow the guides that are linked into the specifications section.
Guide to add more USB Buffer #
1- Close all DJ Softwares
2- Right-Click on the Hercules Systray Icon
3- Choose “Advanced audio Settings”
4- Change the USB Buffer Size up to “4ms” (instead of 1ms). (or try any value that will remove the Clicks, maybe 2ms can do the trick – depends of he USB Chipset of the PC, Intel or Amd platform etc…)
Notice: the USB Buffer size can’t be smaller than the ASIO Buffer Size.